Find What You're Looking For:

Monday, February 29, 2016

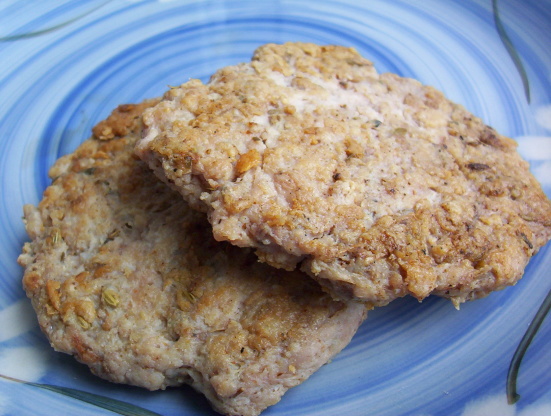
Turkey Breakfast Sausage

Source: Me
SERVINGS 10

INGREDIENTS

  • 1 lb ground turkey
  • 1 teaspoon salt
  • 2 teaspoons sage
  • 1 teaspoon fennel seed
  • 1 teaspoon thyme
  • 1 teaspoon black pepper
  • 1⁄2 teaspoon white pepper
  • 1⁄4 teaspoon cayenne
  • 1⁄4 teaspoon garlic powder
  • 1⁄8 teaspoon ground cloves
  • 1⁄8 teaspoon nutmeg
  • 1⁄8 teaspoon allspice
  • 2 eggs
  • 1/2 cup old fashioned oats


DIRECTIONS
Combine all ingredients (use less pepper if you don't want a spicy taste) and blend well.

If time permits, refrigerate overnight to let the meat absorb the flavor of the spices.

Form into patties and cook as needed in a skillet with some spray, freezing leftovers.

Don't overcook or they will dry out--remove from the heat as soon as they're no longer pink inside, but still juicy.

Lentil Taco Salad

Lentil-Taco-Salad_2

LENTIL TACO "MEAT"
Author: Veggie Primer
Serves: 6

INGREDIENTS

  • 1 cup brown or green lentils
  • 1 14 oz can diced tomatoes with green chilies
  • ½ medium onion, chopped
  • 1 tbs dried parsley
  • 1 tbs taco seasoning (or more to taste)
  • 2⅔ cups water

INSTRUCTIONS
Rinse and sort lentils and then place in rice cooker.

Add remaining ingredients and stir to mix.

Close lid and cook on white rice setting.

Midway through cooking (after about 20 minutes) carefully open lid and stir ingredients a few times with a long handled wooden spoon. (Avoid coming into contact with escaping steam.)

Close lid and continue cooking.

When the cooking cycle ends, open the lid and stir ingredients a few times and then close and let sit for 10 minutes on the keep-warm setting.  Carefully transfer ingredients from rice cooker to a large bowl.

Partially blend the mixture with 3-4 bursts of an immersion blender or place 1-2 cups in a blender or food processor, mix then return to the bowl and stir.

Use in the place of meat in tacos, salads, burritos and more!

Crispy Corn Tortilla Strips

CRISPY CORN TORTILLA STRIPS
Serves: 2-4

INGREDIENTS
  • 2 corn tortillas
  • 1 tsp fresh lime juice
  • ½ tbs taco seasoning

INSTRUCTIONS
Stack tortillas and cut in half with a sharp knife or pizza cutter, then cut each half into ¼ inch strips.

Place strips in a one-gallon plastic bag, drizzle with lime juice and shake in bag to distribute moisture evenly.

Add taco seasoning to bag and shake until tortilla strips are coated evenly.

Arrange tortilla strips in a single layer on a pizza screen and place in toaster oven.

Toast on the darker side of medium for approximately 3 ½ minutes.

Enjoy as a snack or as a soup or salad topping.

LENTIL TACO SALAD - VEGAN AND GF
Serves: 1

INGREDIENTS

  • ⅔ cups lentil taco “meat” (see recipe above)
  • 1 ½ cups packed baby romaine, chopped
  • 1 tbs chopped red onion
  • ¼ cup chopped orange or yellow bell pepper
  • 5 grape or cherry tomatoes, sliced in half
  • 1 tbs sliced black olives
  • ¼ avocado, mashed
  • ½ tbs salsa (I like Chi Chi’s mild)
  • 1 handful of crispy corn tortilla strips (see recipe above)
  • 1 tbs taco sauce (I like the Chi Chi’s brand)


INSTRUCTIONS
Stir ½ tbs of salsa into mashed avocado and set aside.

Arrange baby romaine in a pasta bowl and top with lentil taco “meat.”

Add chopped onion, pepper, tomato, black olives and top with mashed avocado mixture.

Sprinkle crispy corn tortillas on top, add a few shakes of taco sauce and enjoy!

Apple-Cinnamon Cake Bars


These bars a great for breakfast, on the go or a snack (even a dessert).  They aren't too sweet at all, if you like things sweeter, you may want to add more sugar/xylitol. I added the cinnamon drizzle frosting for some added flavor and sweetness and the zest wasn't called for in the recipe, but really brightens up the taste of the bars (I got that idea from my apple crisp recipe that is the best in the world!)

These are very dense and freeze really well.  Once frozen, take out a couple and microwave for 1:30 or so to warm them up and eat warmed up.  If you really want to indulge, serve it with a scoop of ice cream!

Phase 1 | Serves 5 (serving size is 2 bars) | Prep time: 15 minutes | Total time: 1 hour 10 minutes
Source:  Adapted from Haylie Pomroy
My Pictures show a double recipe!

Ingredients

2 1/2 cups rolled oats, divided
1/2 cup birch xylitol or sugar
2 teaspoon cinnamon
1/2 teaspoon sea salt
5 small apples, cored, divided (no need to peel)
1 cup unsweetened rice milk or almond milk*
1 teaspoons vanilla
2 teaspoons orange zest
2 teaspoons lemon zest

Cinnamon Vanilla Drizzle Frosting:

  • 3/4 cup xylitol (put in blender and blend to the consistency of powdered sugar)
  • 1 tsp cinnamon
  • 1 tsp vanilla
  • 2 tsp water or rice milk (or more until desired consistency)

Directions

Preheat the oven to 375 degrees. Line an 8-inch square pan with parchment.

Place half of the oats in a food processor, and process until finely ground. Transfer to a large mixing bowl and stir in the remaining oats, xylitol, cinnamon, zests and sea salt.


Place 3 of the cored apples in the food processor, and process until smooth. Finely chop the remaining 2 apples. Add the apple puree and chopped apples to the mixing bowl, along with the rice milk and vanilla. Stir well.

Spread the mixture in the lined pan and bake 55 minutes, or until the center springs back when lightly touched. Let cool and cut into 11 bars. Enjoy immediately, or freeze in ziplock bags (2 bars per bag) for quick single-serving breakfasts.  

When cooled, put frosting in small ziplock bag, cut the tip and drizzle over the bars.


* If not following the FMD, you can use almond milk.

Wednesday, February 24, 2016

No Bake Almond Butter Granola Bars

No-Bake-Almond-Butter-Granola-Bars

These are so easy as well to have as a healthy snack! You can add any other dried fruit or nuts and even coconut flakes.

Source: www.tosimplyinspire.com
Makes 10 bars


INGREDIENTS 
  • 1 cup Almond butter (or any other nut butter will work too)
  • 1/2 cup almond milk to thin out almond butter if needed
  • 1/4 cup honey (or use xylitol)
  • 1/2 cup coconut oil
  • 3 cups old fashioned rolled oats
  • 1/2 cup sliced almonds
  • 1/4 – 1/2 cup of dried fruit
  • optional: 1/4 cup mini chocolate chips, coconut flakes, or other dried fruit (I used blueberries and dried cranberries)


DIRECTIONS

Line a 9-inch square baking dish with parchment paper.

In a medium sized, combine the almond butter, honey, and coconut oil and heat on low.

Stir until melted and completely smooth.

Remove from heat and stir in oats, raisins and sliced almonds.

Pour mixture into baking dish, spreading an even layer and pressing down firmly with the back of a spatula. Top with mini chocolate chips if you would like

Refrigerate for 15 – 20 minutes

Slice into small bars and store in an air tight container.

ENJOY!!

Easy No-Bake “Granola” Bars


Phase 3 | Serves 10 | Prep time: 15 minutes | Total time: 4 hours 15 minutes

Ingredients


  • 2 1/2 cups old-fashioned rolled oats, divided
  • 1/3 cup chia seeds
  • 1/3 cup xylitol
  • 1/2 cup raw coconut oil
  • 1/2 cup creamy sunflower butter
  • 1 teaspoon vanilla
  • 1/2 teaspoon cinnamon
  • Pinch sea salt
  • 1/4 cup raw cashews
  • 2 tablespoons unsweetened shredded coconut
  • 1 tablespoon raw sunflower seeds
  • 1 tablespoon sesame seeds


Directions

Place 1/2 cup of the oats, the chia seeds, and the xylitol in a blender, and grind to a fine powder. Transfer to a food processor and add the next 5 ingredients (coconut oil through salt). Process until smooth.

Scrape down the sides of the food processor. Add the rest of the oats, the cashews, coconut, sunflower seeds, and sesame seeds. Pulse just until combined, but still chunky (about 7 quick pulses), scraping down the sides as needed.

Line an 8-inch square pan with parchment paper, crisscrossing two pieces and leaving the edges hanging over the sides of the pan. Press the granola mixture firmly into the lined pan, and chill until firm (about 4 hours). Cut into bars, and store in the fridge.

Mint-Chip Meringues


Phase 2 | Serves 5 (serving size is 3 meringues) | Prep time: 15 minutes | Total time: 2 hours 15 minutes

Ingredients


  • 1 1/4 cups birch xylitol
  • 5 large fresh egg whites, at room temperature (pasteurized whites won’t whip)
  • 1/4 teaspoon cream of tartar
  • 1 tablespoon spirulina powder
  • 1/4 teaspoon peppermint extract
  • 1 tablespoon raw cacao powder
  • 3 tablespoons cacao nibs


Place the xylitol in a blender, and process to a fine powder.

Preheat the oven to 200 degrees. Line a baking sheet with parchment paper. Using an electric mixer, beat the egg whites and cream of tartar on medium-high speed until white and foamy, about 1 minute. 

With the mixer running, gradually add the powdered xylitol in 3 additions, beating for 2 minutes between each addition. Beat until firm peaks form, about 2 minutes longer. 

Add the spirulina and peppermint extract; beat to blend, about 1 minute.

Dollop the meringue in 15 large rounds on the lined baking sheet. 

Sift the cacao powder and sprinkle the cacao nibs evenly over the meringues. 

Bake 2 to 2 1/2 hours, until the meringues are dry to the touch (they’ll firm up as they cool).

Place the pan on a wire rack to cool. Store the meringues in an airtight container at room temperature, with sheets of parchment between layers.

Slow-Cooker Braised Brisket (Machaca)


Servings:  10 Cups
Source: The Kitchen Food Network: Marcela Valladolid

Ingredients

Marinade:
  • 1/4 cup fresh lime juice
  • 2 tablespoons Maggi sauce or 1 tablespoon soy sauce plus 1 tablespoon Worcestershire sauce
  • 3 cloves garlic, minced
  • 1 serrano chile, stemmed, seeded, and minced
  • Salt and freshly ground black pepper
  • 1/2 cup olive oil
  • One 3- to 4-pound beef brisket, trimmed and cut into 3 large pieces
Brisket:
  • 3 tablespoons vegetable or olive oil
  • 1 1/2 cups diced onion (about 1 large)
  • 1 cup beef broth
  • 1 cup diced red bell pepper (about 1 large)
  • 1/2 teaspoon dried oregano
  • 3 cloves garlic, minced
  • 2 serrano chiles, stemmed, seeded and minced
  • One 28-ounce can diced tomatoes with their juice
  • Salt and freshly ground black pepper
Braised Brisket Tostadas:
  • 1 1/2 pounds (about 3 1/2 cups) shredded Slow Cooker Braised Brisket, heated
  • Eight 4-inch crisp corn tostada shells
  • 1 cup shredded iceberg lettuce
  • 1 avocado, peeled, pitted and finely diced
  • 1 cup fresh tomato salsa
  • 1/2 cup Mexican crema or sour cream
  • 4 ounces crumbled queso fresco cheese (about 1 cup)
  • Lime wedges, for serving
Directions


For the marinade: 
Combine the Maggi sauce, lime juice, 2 tablespoons water, garlic and serranos in a medium-size bowl, season with salt and pepper. While whisking constantly, slowly add the olive oil, Put the brisket pieces into a large food-safe plastic bag and pour the marinade over it, turning the meat to coat. Seal and refrigerate for at least 8 hours or preferably overnight.

Allow the meat to come to room temperature. Drain the meat and discard the marinade.

For the brisket: 
Pour the oil into the bottom of a slow cooker. Add the onions, broth, peppers, oregano, garlic, chiles, tomatoes and some salt and pepper. Mix well, and then nestle the meat into the liquid in the bottom of the slow cooker. Cook the brisket on medium-high heat until the meat is tender and shreds easily with a fork, about 5 hours.

Using a slotted spoon, transfer the meat to a cutting board and let stand until cool enough to handle, about 15 minutes. Shred the meat into 2-inch-long pieces. Return the shredded meat to the slow cooker, stir to combine, and let stand until the meat is hot, about 10 minutes. Taste and season with salt and pepper, if necessary.

The warm braised meat can be used to fill burritos, tacos, tostadas or sandwiches. Leftover meat can be stored in an airtight container for up to 3 days or frozen in plastic freezer bags or containers for up to 1 month.

Braised Brisket Tostadas:
Spread about 1/3 cup of the warm meat over each of the crisp shells. Top each tostada with about 2 tablespoons lettuce, some diced avocado and 2 tablespoons salsa. Drizzle about 1 tablespoon crema over the top and garnish with crumbled queso fresco.

Serve with lime wedges on the side for squeezing over the top.


Thursday, February 18, 2016

DIY: Garlic Salt


In a glass jar, pour in 1 cup of fine sea salt. Peel and remove root end of 8 garlic cloves. Bury them in the salt, and close the jar. Store it in a cool, dark place. Mix a few times daily, for three days. Remove garlic cloves. The salt will absorb the garlic flavor and, lo and behold, garlic salt for just pennies!

Sunday, February 14, 2016

Smashed Avocado, Black Bean and Roasted Tomato Toasts

06-DSC_7687


Seeded bread is toasted and slathered with creamy avocado and protein-rich black beans. Roasted tomatoes on this open-faced sandwich brings out the flavorful goodness.

Source: Adapted Recipe from Blissful Basil
Serves: 1

Ingredients
  • 1 medium beefsteak tomato, cut into 4 slices
  • ½ tablespoon olive oil
  • 2 pieces of sprouted grain, multi-grain or seeded bread, toasted
  • 1 small avocado
  • ¼ teaspoon cumin
  • 1 tablespoon minced red onion
  • ½ minced garlic clove or more if you like
  • Cilantro (optional, if you don't like it)
  • ½ of a lime, juiced
  • salt and pepper
  • ⅓ cup canned organic black beans, rinsed


Instructions
Preheat oven to 400 degrees Fahrenheit.

Line a small baking sheet with parchment paper. Spread the tomato slices out across the baking sheet. Drizzle with olive oil and sprinkle with salt and pepper.

Roast tomatoes for 15 minutes. Remove from oven and let cool.

While the tomatoes are roasting, smash the avocado in a small bowl. Add in the lime juice, cilantro, red onion, garlic, salt and pepper and cumin, to taste. Stir in the black beans.

Slather the toasts with the avocado mixture and top each with 2 slices of roasted tomato. 

Parmesan-Crusted Pork Chops


Yield:4 servings
Level:Easy 

Ingredients

  • 2 large eggs
  • 1 cup dried Italian-style bread crumbs*
  • 3/4 cups freshly grated Parmesan
  • 4 (1/2 to 3/4-inch thick) center-cut pork loin chops (each about 10 to 12 ounces)
  • Salt and freshly ground black pepper
  • 6 tablespoons olive oil
  • Lemon wedges, for serving
*If you don't have bread crumbs (which I never do), make your own.  Toast a couple pieces of bread (gluten free or sprouted grain) then put in a mini processor or blender to make crumbs.  Add salt, pepper, fresh Italian parsley or dried and some garlic powder to make it Italian).


Directions

Whisk the eggs in a pie plate to blend. Place the bread crumbs in another pie plate. Place the cheese in a third pie plate. Sprinkle the pork chops generously with salt and pepper. 

Coat the chops completely with the cheese, patting to adhere. Then, dip the chops into the eggs, then coat completely with the bread crumbs, patting to adhere.

Heat 3 tablespoons of oil in a very large skillet over medium heat. Add pork chops, in batches if necessary, and cook until golden brown and the center reaches 150 degrees, about 6 minutes per side (if they are thick chops, if thinner make sure not to cook that long otherwise they will dry up, more like 3 minutes on each side). Transfer the chops to plates and serve with lemon wedges. (lemon adds a lot to these, I would strongly suggest squeezing FRESH lemon juice over the chops right before eating).

Recipe courtesy of Giada De Laurentiis
SHOW:
Everyday Italian
EPISODE:
Personal Chef

Read more at: http://www.foodnetwork.com/recipes/giada-de-laurentiis/parmesan-crusted-pork-chops-recipe.html?oc=linkback

Saturday, February 13, 2016

DIY: Extracts: Vanilla, Lemon, Orange and Mint

DSC_2347-2

DIY Flavored Extracts
Author: Tina @ Just Putzing Around the Kitchen
Recipe type: DIY
Prep time:  5 mins Total time:  5 mins
Yields: Varies


Homemade Vanilla Extract

  • Vanilla Extract (single 4oz bottle)
  • 3 whole vanilla beans
  • Vodka (You can also use bourbon)

Cut your vanilla beans in half, then split open each half to expose the vanilla seeds on the inside of the pod.


Place cut vanilla beans inside your glass bottle.
Add vodka, filling up to the neck of the bottle.
Seal tightly and store bottle in a cool, dry place.

Every few days, tilt your bottle upside down to gently mix the liquid inside.

After 5-6 weeks, you have extract! (If you leave in your vanilla beans, when you start running low, just add more vodka and wait a little.)

Mint Extract (4oz)

  • ½ cup mint leaves
  • Vodka

Stuff mint leaves into your glass bottle.
Using a chopstick, skewer, or other poking device, lightly bruise/crush the leaves inside the bottle.

Add vodka, filling up to the neck of the bottle.
Every few days, tilt your bottle upside down to gently mix the liquid inside.

After 5-6 weeks, you have extract! (I’m not sure if, like vanilla extract, you can just leave the mint leaves inside. Since it’s leafy plant matter which disintegrates more easily, it may be a good idea to take it out. My leaves went from a vibrant green in the beginning to kind of a dull brown by the end so I took them out just to be safe – I poured my mint extract into another container through a sieve and discarded the mint leaves, then poured the filtered extract back into the bottle.)

Orange Extract (4oz)

  • 1 large navel orange
  • Vodka

Peel thin strips of zest from ½ of your orange.
Place zest into your glass bottle.

Add vodka, filling up to the neck of the bottle.
Every few days, tilt your bottle upside down to gently mix the liquid inside.

After 5-6 weeks, you have extract! (I think with citrus peels the acid (and alcohol bath), it’s probably safe to leave the peels inside the bottle like a vanilla bean for re-fill purposes. If you don’t feel comfortable doing this, take it out!)

Lemon Extract (4oz)
1 large lemon
Vodka

Peel thin strips of zest from your lemon.
Place zest into your glass bottle.

Add vodka, filling up to the neck of the bottle.
Every few days, tilt your bottle upside down to gently mix the liquid inside.

After 5-6 weeks, you have extract!

I know people are going to ask, so:

Bottles – 4oz Boston Round Glass Bottles from Specialty Bottle
Labels – Avery Removable Multi-Use Labels, Kraft Brown, 1.125 x 2.25 Inches, Pack of 24 (40151)

Ribbon – Offray Spoolo Ribbon (White) from Michael’s


DYI: Homemade Vanilla Liquid Stevia (or other flavors)


Source: wholenewmom.com

Ingredients
1/4 cup water
2 1/4 tsp stevia extract
7 tsp vanilla extract (use other extracts for other flavorings.)

Directions
1.  Pour water into a small saucepan.
2.  Warm over medium heat.  Add stevia extract.
3.  Heat and stir until stevia is dissolved.
4.  Remove from heat.  Add vanilla extract.
5.  Pour into a small glass bottle with dropper.

Note:  There will be a little too much to fit into the bottle.  Just keep it in another bottle or container and use it first.  I chose these measurements for ease of use.

Store in the fridge.  Thanks to a reader’s inquiry, I now know you should keep your liquid stevia in the fridge for the flavor to last longer. It won’t spoil but you may need more drops to have the same amount of flavor if you leave it at room temperature. 

Coconut Butter

Paleo Coconut Butter

The process is simple – add in 6 cups of coconut flakes and start blending on high (you need a minimum of around 3 cups of coconut flakes for it to work). When the flakes get stuck to the sides of the blender, turn off the blender and use a spoon to push the flakes down. Repeat 3 times. Then add in 2 tablespoons of melted coconut oil (you can melt it in the microwave) and blend on high for 10 minutes.

This works more consistently if you start with only about 4 cups of shredded coconut.  Make that into a butter and then add 1 cup of additional coconut at a time, blending to a butter with the addition of each cup.
It’s as simple as that!

And how creamy and sweet tasting!  It will come out quite warm and runny, but it will harden up as you let it sit.  If you need to speed up the process, just put it into your fridge or freezer (or outside if it is winter.

Your coconut butter will become spreadable around 76 degrees, but you can use a knife or apple corer to get it out of the jar if it is colder than that in your home (it sure is in mine in the winter).


Raw Chocolate Frosted Fudge Brownie


Source: Naturally Sweet and Gluten-Free

These brownies offer a double fudgy treat that’s reminiscent of Nutella in its chocolate-hazelnut glory. I cut these into small, bite-sized morsels—but that’s all you’ll need to satisfy your chocolate craving!

Ingredients

For the Brownies:

  • 1 1/2 cups raw walnut halves and pieces
  • 1 1/2 cups raw or lightly toasted hazelnuts (see note)
  • 2/3 cup xylitol
  • pinch fine sea salt
  • 3/4 cup raw cacao powder (see note)
  • 2 tsp pure vanilla extract
  • 1/2 tsp pure plain or vanilla liquid stevia or to taste

For the Fudge Topping:

  • 1 cup coconut butter (not coconut oil), melted (See recipe on how to make it)
  • 1 cup raw or lightly toasted hazelnuts
  • 1 heaping 1/4 cup raw cacao powder (see note)
  • 1/4 cup xylitol 
  • 1 tsp pure vanilla extract
  • pinch fine sea salt
  • 20-30 drops plain or vanilla liquid stevia, or to taste

Directions
Make the brownie:
1.  Line an 8.5 inch (21.5 cm) square pan with parchment paper and set aside (for thicker brownies, recipe can be made in a loaf pan instead).
2.  In a food processor, whir the walnuts, hazelnuts, xylitol, and salt until the mixture resembles coarse crumbs. Add the cacao powder, vanilla powder, and stevia and process until it begins to come together in a ball. Stop and scrape the sides if necessary while processing. Take care not to overprocess, or you’ll end up with nut butter! The mixture should be moist enough to stick together when pinched, but not wet.
3.  Turn the brownie “dough” into the pan and press down firmly with your hands or a stiff spatula so that the mixture is dense and there are no air bubbles. Place in the refrigerator while you prepare the fudge topping.

Make the fudge topping:
1.  Place the coconut butter, hazelnuts, cacao powder, xylitol and salt in a high-speed blender. Using the tamper to push the mixture toward the blades, blend until the mixture liquefies, about 5 minutes, stopping to scrape down the sides as necessary.
2.  Add the vanilla extract and stevia and blend again.
3.  Pour the mixture over the brownie dough in the pan.
4.  Return to the refrigerator until the fudge sets up, about one hour.
5.  Using the parchment paper as a sling, pull out the brownie and place it on a cutting board.
6.  Cut into 1.-inch (4-cm) squares and store, covered, in the refrigerator until ready to serve.
7.  Will keep, covered, in the refrigerator, for up to 5 days. May be frozen; defrost, covered, in the refrigerator overnight.

Note: For brownies that are not completely raw, you can use lightly toasted nuts and unsweetened cocoa powder instead of the raw cacao powder (though you may need to increase the sweetener in that case).

For those with allergies, substitute other nuts or seeds as needed.  I think almonds would be especially nice.

Vegan Parmesan Cheese

Vegan Parmesan Cheese enhances so many dishes. There are only four ingredients and it only takes about 5 mins. Sprinkle it on pasta, soups, salads and more.

Prep Time: 5 minutes
Total Time: 5 minutes
Yield: 1 cup
Serving Size: what you like
Source: Vegan Freezer

Ingredients

  • 1 cup raw cashews
  • 1/4 cup nutritional yeast
  • 1/2 teaspoon sea salt
  • 1/4 teaspoon garlic powder

Directions

Add all of the ingredients to a food processor.

Pulse until a fine crumb mixture forms. Literally seconds.

Use in just about any savory dish you can think of.

Keep in the refrigerator for about a month or keep in the freezer in a freezer container for up to 12 months.

Cashew Cheddar Cheese Spread


Cashew Cheddar Cheese Spread is simple and versatile. The sharp flavor of cheddar but no dairy! Use it in casseroles, Mexican style dishes and party food.

Prep Time: 4 hours, 10 minutes
Total Time: 4 hours, 10 minutes
Yield: 3 Cups
Serving Size: Whatever you Like

Ingredients

  • 2 cups raw cashews
  • 1/2 cup water
  • 1/2 cup nutritional yeast
  • 1/4 cup lemon juice
  • 2 teaspoons dijon mustard
  • 1/2 teaspoon garlic powder
  • 1/2 teaspoon sea salt
  • 1/4 teaspoon ground black pepper

Directions

Soak the cashews for about 4 hours and then drain.

Place all ingredients into a blender and blend until it is smooth and creamy.

Just wait until you taste it!

The spread will keep in the refrigerator for about 1 week.

You can also freeze it.

IF FREEZING:

Please follow any of the directions defined in my article Preparing Food for the Freezer

TO PREPARE AFTER FREEZING:

Put in the fridge the day before using. Stir and use in any manner that you like.

Ranch Dressing (made from cashews)


Dairy Free Ranch Dressing - rich and creamy and simple to make from scratch. Fun and creative then use it on tacos, appetizers, salads and as a dip.

Prep Time: 10 minutes
Total Time: 10 minutes
Yield: 1 1/2 cup dressing
Serving Size: whatever you like
Source: Vegan in the Freezer

Ingredients
  • 1 cup cashews, soaked for at least 4 hours
  • 3/4 cup Almondmilk Light
  • 3 tablespoons apple cider vinegar
  • 1 tablespoon maple syrup (stevia)
  • 2 teaspoons onion powder
  • 1/2 teaspoon dried parsley
  • 1/2 teaspoon dried chives
  • 1/2 teaspoon dried dill weed
  • 1/4 teaspoon ground black pepper


Directions

Put the soaked cashews in a food processor. Add all of the remaining ingredients. Process until smooth.

Add more almond milk, if needed, to get the consistency of dressing.

The flavors will meld after resting in the refrigerator.for a couple of hours but you can still use it immediately.

Pour into container and store in refrigerator.

This will keep in the refrigerator for about 2 weeks.

Easy Pumpkin Waffles

Easy Pumpkin Waffles have all the seasonings of a pumpkin pie. There are no surprises just good clean taste that you can top with your favorite syrup.

Prep Time: 15 minutes
Cook Time: 30 minutes
Total Time: 45 minutes
Yield: 8 to 10 Waffles
Serving Size: 1 to 2 Waffles
Source:  Vegan in the Freezer

Ingredients
  • 2 cups all purpose flour or Hayley Pomroy's baking mix
  • 3 teaspoons baking powder
  • 2 teaspoon cinnamon
  • 1/4 teaspoon ground cloves
  • 1/4 teaspoon salt
  • 2 eggs
  • 2 cups almond milk
  • 1 can (about 15 oz.) Pumpkin Puree that you would use for pumpkin pies
  • 1/2 cup brown sugar, packed
  • 1 Tablespoon Coconut Oil


Directions

Mix the eggs and set aside. 

To a large bowl add the flour, baking powder, cinnamon, ground cloves and salt.

In another bowl add the almond milk, eggs, pumpkin puree, brown sugar and oil.

Mix the eggs in really well.

Pour the liquid mixture into the flour mixture and mix until just blended.

Lightly brush the waffle iron with coconut oil. I have one of these Silicone Brushes and it is wonderful. I put it in the dishwasher and it turns out just like new.

Cook the waffles according to your waffle iron directions. Mine worked with the heat dial on #3 1/2 for about 6 minutes.

Serve hot with maple syrup.

They will keep in the fridge for about 4 days.

To reheat a large amount - put on a baking sheet and crisp up at 350 degrees for about 3 minutes. If your just want a couple - break them in half on their waffle crease and use the toaster.
TO FREEZE:

After they have cooled you may freeze them.

They defrost quickly so it really doesn't take any planning. Reheat the same as above - put on a baking sheet and crisp up at 350 degrees for about 3 minutes. If your just want a couple - break them in half on their waffle crease and use the toaster.