Find What You're Looking For:

Wednesday, September 28, 2016

Pressure Cooker Cinnamon Apple Steel Cut Oats

Pressure Cooker Cinnamon Apple Steel Cut Oats - cook better tasting steel cooked oats faster in the pressure cooker.

Yield: 4 - 6 servings

Ingredients

  • 1 tablespoon butter or coconut oil
  • 1 cup steel cut oats
  • 3 1/2 cups water
  • 1 large apple, peeled, cored and diced
  • 2 tablespoons light brown sugar or honey or sugar substitute
  • 1 1/2 teaspoons ground cinnamon
  • 1/4 teaspoon salt

Instructions

Add butter to pressure cooking pot, select Sauté. When butter is melted add the oats and toast, stirring constantly, until they start to darken and smell nutty, about 3 minutes.

Add water, apples, brown sugar, cinnamon, and salt. Select high pressure and set 10 minutes cook time.

When beep sounds, turn off pressure cooker and use a natural pressure release for 10 minutes and then do a quick pressure release to release any remaining pressure.

When valve drops carefully remove lid. Stir oats. Cover and let sit five or 10 minutes until oats are desired thickness.

Top with almond milk, nuts and additional honey or sugar, if desired.

Source:  adapted from pressurecookingtoday.com

Pressure Cooker Lemon Blueberry Steel Cut Oats

Lemon-Blueberry-Steel-Cut-Oats-2-Pressure-Cooking-Today

These Lemon Blueberry Steel Cut Oats are creamy, lightly sweet, flavored with lemon zest, studded with blueberries and chia seeds, and topped with sliced almonds and a splash of almond milk. A heart health, delicious way to start the day!

I used fresh blueberries when I made these oats, but frozen would work well too. The chia seeds add extra fiber and protein to the oats. I used the zest from 1 lemon, then froze the lemon juice to use in another recipe.

The lemon flavor in this recipe is mild, but really brightens up the flavor of the oatmeal. It’s a nice balance to the sweet juicy blueberries. The almonds add the crunch you get from the coffee cake streusel top. 


Yield: 4 servings

Ingredients

  • 1 tablespoon butter or coconut oil
  • 1 cup steel cut oats
  • 3 cups water
  • 1/2 cup almond milk
  • 2 tablespoons sweetner (Xylitol, Honey, Substitute or Sugar)
  • 1 tablespoon lemon zest
  • 1/4 teaspoon sea salt
  • 1 cup fresh or frozen blueberries
  • 1/4 cup chia seeds

Instructions
Add butter/oil to pressure cooking pot, select Sauté. When butter is melted add the oats and toast, stirring constantly, until they smell nutty, about 3 minutes.

Add water, milk, sugar, zest, and salt. Select high pressure and set 10 minutes cook time.

When beep sounds, turn off pressure cooker and use a natural pressure release for 10 minutes and then do a quick pressure release to release any remaining pressure. When valve drops carefully remove lid.

Stir oats. Stir in blueberries and chia seeds. Cover and let sit five minutes until oats are desired thickness.


Top with additional blueberries, honey or agave, sliced almonds, and splash of milk.

Source: adapted from pressurecookingtoday.com

Pressure Cooker Carrot Cake Oatmeal

Pressure Cooker Carrot Cake Oatmeal - The flavors of a carrot cake in a warm, hearty, heart-healthy, fun breakfast. 

Yield: 6 servings

Ingredients

  • 1 tablespoon butter or coconut oil
  • 1 cup steel cut oats
  • 4 cups water
  • 1 cup grated carrots
  • 3 tablespoons pure maple syrup
  • 2 teaspoons cinnamon
  • 1 teaspoon pumpkin pie spice
  • 1/4 teaspoon sea salt
  • 3/4 cup raisins
  • 1/4 cup chia seeds

Instructions:

Add butter to pressure cooking pot, select Sauté. When butter/oil is melted add the oats and toast, stirring constantly, until they smell nutty, about 3 minutes.

Add water, carrots, maple syrup, cinnamon, pumpkin pie spice, and salt. Select high pressure and set 10 minutes cook time.

When beep sounds, turn off pressure cooker and use a natural pressure release for 10 minutes and then do a quick pressure release to release any remaining pressure. When valve drops carefully remove lid.

Stir oats. Stir in raisins and chia seeds. Cover and let sit five or 10 minutes until oats are desired thickness.

Top with additional raisins, maple syrup, chopped nuts, and almond milk.

Source:  adapted from pressurecookingtoday.com

Pressure Cooker Pumpkin Steel Cut Oats with Pecan Pie Granola

Pressure Cooker Pumpkin Steel Cut Oats topped with a sweet, buttery pecan pie granola. A fiber filled breakfast made with pumpkin and warm fall spices.

Yield: 6 servings

Ingredients

  • 1 tablespoon butter or coconut oil
  • 1 cup steel cut oats
  • 3 cups water
  • 1 cup pumpkin puree
  • 1/4 cup pure maple syrup
  • 2 teaspoons cinnamon
  • 1 teaspoon pumpkin pie spice
  • 1/4 teaspoon salt

Instructions
Add butter to pressure cooking pot, select Sauté. When butter is melted add the oats and toast, stirring constantly, until they smell nutty, about 3 minutes.

Add water, pumpkin puree, maple syrup, cinnamon, pumpkin pie spice, and salt. Select high pressure and 10 minutes cook time.

When beep sounds, turn off pressure cooker and use a natural pressure release for 10 minutes and then do a quick pressure release to release any remaining pressure. When valve drops carefully remove lid.

Stir oats. Remove cooking pot from the pressure cooker and let oats rest in the cooking pot uncovered for 5 - 10 minutes until oats thicken to desired consistency.

Serve warm with pecan pie granola, milk and maple syrup if desired.

Recipe for Pecan Pie Granola click here.

Source:  pressurecookingtoday.com

Pecan Pie Granola


Ingredients:
  • 4 cups old fashioned oats
  • 1/2 cup light brown sugar, packed
  • 1 cup pecans, chopped
  • 1/4 teaspoon of sea salt
  • 1/3 cup butter, melted or coconut oil
  • 1/4 cup pure honey
  • 1 tablespoon pure vanilla extract

Instructions:

In a large bowl mix oats, brown sugar, pecans, and salt.
In a microwave safe bowl heat butter/oil and honey until warm, about 30 seconds. Whisk in vanilla. Pour over the oat mixture and mix thoroughly until everything is completely coated.

Spread evenly on a parchment or silpat covered cookie sheet. Bake at 300º for about 20 minutes until slightly golden brown. Don’t stir during baking. Cool completely and break into pieces. Store in an air tight container

Source:  adapted from pressurecookingtoday.com and Barbarabakes.com


Yield:  3/4 cup syrup + 1 latte

Ingredients:

For the Salted Pumpkin Spice Syrup:

  • 1/2 cup coconut sugar
  • 1/2 cup pure maple syrup
  • 1/3 cup unsweetened pumpkin purée*
  • 1 teaspoon cinnamon
  • 1/2 teaspoon freshly grated nutmeg
  • 1/4 teaspoon ground cloves
  • 1/4 teaspoon pink Himalayan sea salt or other fine sea salt, or to taste
  • 1/4 teaspoon pure vanilla bean powder or 1 vanilla bean, seeded or 1/2 tsp pure vanilla extract

For the Pumpkin Spice Latte:

  • 2 tablespoons (1 shot/1 ounce) espresso
  • 1 cup unsweetened almond milk
  • 3-4 teaspoons Salted Pumpkin Spice Syrup
  • Coconut Whipped Cream, for garnish (optional - I usually skip it)
  • Dash cinnamon or pumpkin pie spice, for garnish

Instructions:

For the Pumpkin Spice Syrup: 

Whisk together all syrup ingredients in a medium pot over medium heat. Simmer for about 5-6 minutes, stirring frequently, until smooth and slightly thickened. Remove from heat. Once cool, pour leftovers into a jar and secure lid.

Prepare the Espresso:

Tip: If you don't have an espresso machine, you could easily buy a few espresso shots from the coffee shop and keep the leftovers in the fridge for 1-2 days and reheat as needed.
Add milk into a small pot. Heat over medium and bring to a simmer. Immediately remove from heat. Froth the milk using a milk frother or a French Press. 
Tip: Again, if you don't have an espresso machine, you can use a French Press to froth the milk. Simply add the heated milk into the press and secure lid (make sure it’s closed and not vented). Pump the plunger vigorously for about 30-60 seconds. Be careful as the hot milk can shoot out a bit!
Pour hot espresso into a mug. Top with all of the frothy milk. Add 3-4 teaspoons of the syrup, to taste, and gently stir to combine. Top with a dash of cinnamon or pumpkin pie spice, and Coconut Whipped Cream, if desired. Serve immediately. 

The syrup will keep in an air-tight container in the fridge for at least 2 weeks, most likely longer. You can use it in regular coffee too, or try stirring it into a bowl of hot oatmeal for a seasonal twist!

Notes:


If your pumpkin puree is on the grainy side (some brands are more than others), it might benefit from a quick blend or puree in the blender or food processor before using.

Source:  Oh She Glows


Flourless Black Bean Avocado Brownies


Healthy Flourless Black Bean Avocado Brownies

Say whaaat? Don't roll your eyes or make that "eww that sounds so gross" facial expression!  Honestly, you will be surprised at how delicious these are!

Healthy vegan avocado brownies made with black beans instead of flour, and avocado instead of butter or oil! You’re going to love these fudgy chocolate-packed vegan and gluten free treats.

INGREDIENTS

  • 1 large flax egg or 1 egg
  • 1 - 15oz can low sodium black beans, rinsed and drained
  • 1/2 medium to large ripe avocado
  • 1 tablespoon vanilla extract
  • 1/2 cup packed dark brown sugar*
  • 2/3 cup unsweetened cocoa powder
  • 1 teaspoon coconut oil
  • 1/4 teaspoon baking soda
  • 1/4 teaspoon baking powder
  • 1/3 cup vegan chocolate chips, plus 2 tablespoons for sprinkling


INSTRUCTIONS

Preheat oven to 350 degrees F. Grease a 8×8 inch baking pan (I use coconut oil spray) .

Place egg, black bean, avocado, vanilla, and brown sugar and process in a food processor until smooth. Add in cocoa powder, coconut oil, baking soda, and baking powder and process again until smooth. 


Note:  Batter will be thick. If batter is way too thick and won't process, you can add in a tablespoon or two of almond milk. This batter needs to be very thick in order to produce fudgy brownies.
Fold in chocolate chip or sprinkle onto batter then transfer to prepared pan and use a spatula to spread evenly to sides. Sprinkle top of batter with 2 tablespoons of remaining chocolate chips.

Bake for 22-30 minutes or until knife inserted in center comes out somewhat clean. We don't want these to dry out, but we also don't want them completely raw either! The top of the batter should be completely set and no longer jiggle. Cool pan completely on wire rack then cut into 12 bars.

NOTES
*You may be able to sub the brown sugar for honey, agave or maple syrup. I would reduce to 1/3 cup though.

The brownies are best went made in a food processor so that beans can blend together better.

Serve either at room temperature or cold. They should be stored in the fridge in an air tight container.


You can also freeze these and thaw out for an easy treat. I would wrap each one in parchment paper then put in a large gallon zip lock so you can take 1 out a time if you wanted.  They don't take long to thaw out.

Source:  Ambitious Kitchen

Saturday, September 24, 2016

Gluten-Free Chocolate Chip Cookies

Gluten-free Chocolate Chip Cookies Recipe

These cookies have a lot going for them. For starters, they are absolutely delicious and everything that a chocolate chip cookie should be: chewy around the edges, soft in the middle, and full of rich chocolate and caramel-like flavors.

chocolate chip cookie doughcookie doughNaturally Sweetened, Gluten-free Chocolate Chip Cookies Recipe

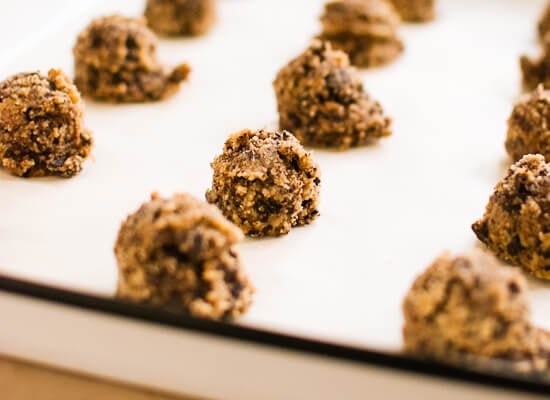
As you can see here, my last batch puffed up quite a bit in the middle. My other batches spread out more during baking like traditional Tollhouse cookies. The cookies seem to spread out the most when you plop the just-mixed dough onto the baking sheet and bake right away. They spread out a little less if you give the coconut flour a few minutes to soak up some extra moisture, and they spread out the least if you let the dough chill in the refrigerator for ten or more minutes before baking.


Naturally sweetened, gluten-free chocolate chip cookies made with almond meal and coconut flour. These cookies remind me of classic Tollhouse cookies, but much more healthy and easy to make—only one bowl required! Since this recipe is egg free, it is easily made vegan by substituting coconut oil for butter and using maple syrup instead of honey.

Yields 24 small cookies.

Ingredients
  • ¾ cup almond flour or almond meal, very firmly packed (about 3 ounces or 100 grams)
  • ¼ cup coconut flour, very firmly packed (about 1½ ounces or 43 grams)
  • 1 teaspoon baking soda
  • ½ teaspoon fine grain sea salt
  • Dash cinnamon (optional)
  • ½ cup butter or coconut oil, melted
  • ½ cup real maple syrup (preferably grade B) or honey
  • 1 teaspoon vanilla extract
  • 6 ounces dark chocolate, chopped, or 1 cup chocolate chips
Instructions
Preheat oven to 350 degrees Fahrenheit and line a cookie sheet with parchment paper or use a silicone mat.
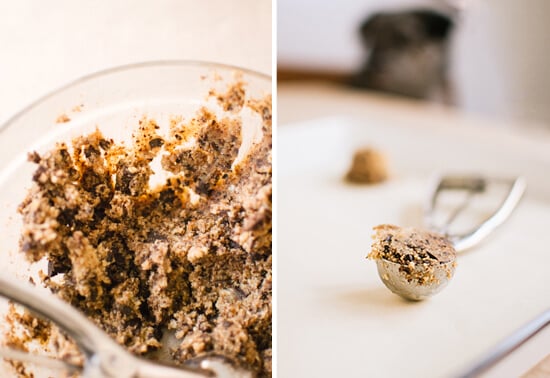
In a medium bowl, whisk together the flours, baking soda, salt and cinnamon. Pour in the melted butter (or melted coconut oil), maple syrup (or honey) and vanilla extract, and mix thoroughly. Stir in the chocolate.

Let the dough rest for 5 minutes in the refrigerator so the coconut flour can absorb some of the excess moisture (or let the dough chill in the fridge for 10+ minutes if you want fat cookies, like those shown here). Scoop dough, one tablespoon at a time, in mounds onto the baking sheet, leaving a couple inches around each cookie.

Bake for about 11 minutes, until golden brown. Let them cool on the baking sheet for a few minutes, then slide the parchment paper onto a cooling rack to finish cooling. The cookies will be fragile when they are warm but will firm up as they cool.
Notes


These cookies are gluten free, thanks to a simple combination of two flours (almond and coconut flours). They’re naturally sweetened with maple syrup, which lends a brown sugar-like sweetness. They’re eggless, too, which means that the recipe is easily vegan. These cookies are about as healthy as cookies can be.


The original recipe calls for almond flour, but you can use almond meal from Trader Joe’s and they will turn out great.  Most stores now carry coconut flour in their baking section.  Bob's Red Mill is very popular and priced pretty good.  You can always check out Amazon.com too.  Coconut flour is essential to this recipe because its high fiber content soaks up the extra moisture from the liquid sweetener, ensuring that the cookies don’t spread out too much on the pan (more on that later).

The cookies taste fantastic whether you use maple syrup or honey, but I think maple syrup tastes more like brown sugar and yields a more traditionally flavored cookie. I also tried using coconut oil instead of butter, which, as you might expect, produced a cookie with a more pronounced coconut flavor. I’m partial to the butter version. I’m not quite sure why, but the coconut oil cookies were thinner and seemed ever-so-slightly brittle the next day. Lastly, I chose to chop up dark chocolate instead of using chocolate chips, so maybe I shouldn’t call these chocolate chip cookies after all. Whether you choose chips or chunks or chop your own chocolate, just make sure it’s good quality.


Make it dairy free/vegan: Just use the coconut oil instead of the butter (to make it dairy free) and choose maple syrup as your natural sweetener instead of the honey (to make it vegan).


Source:  Cookie and Kate, Recipe adapted from Gluten Free Fix. 

Monday, September 12, 2016

Basic Oatmeal Pancakes


Ingredients:
  • 3/4 cup rolled oats - put into blender to make a flour out of them
  • 1 egg
  • 1/2 tsp cinnamon
  • 1/2 vanilla
  • 1/4 tsp baking powder
  • 1/2 cup coconut, rice or almond milk
  • 1 packet powdered stevia (I used Truvia)

Instructions: 

Blend all ingredients.

Preheat skillet over medium heat, add tablespoon of coconut oil and let melt. 

Pour pancakes in pan and flip once the bubbles on the top appear and the pancake easily lifts from the pan.

Serve with almond butter, fresh strawberries, or blueberries. 

Source:  Haylie Pomroy

Oat, Pumpkin, Zucchini Pancakes


Ingredients:

  • ½ cup of old fashioned oats
  • ¼ cup of grated zucchini
  • ¼ cup canned unsweetened pumpkin
  • ¼ cup of grated carrots
  • 1 tsp of baking powder
  • 2 egg whites
  • 1 tsp of cinnamon
  • 2 tbsp. of Stevia (to taste)
  • A pinch of baking soda
  • ¼ cup of water

Fruit Topping: 

  • ½ cup of blueberries
  • ½ cup of strawberries

Cacao Topping:

  • 1 tablespoon of unsweetened cacao
  • ½ cup of water
  • 1 additional tbsp. of Stevia (to taste)
  • 1 tsp Vanilla


Tip: You can save time by leaving all the ingredients (except the fruit, water, and ingredients for cacao sauce) in a zip lock bag the night before.

Instructions:

Put all the ingredients (except the fruit and the ingredients for the cacao sauce) in a blender and blend it for 2 minutes. The resulting texture should be a little bit thick.

Let the mixture rest for two minutes while heating the pan for the next step. ALWAYS let the mixture rest, that is the secret for successful pancakes.

Form the mixture into small circles in a nonstick pan and cook on medium heat for 2.5 minutes, then flip. Use approximately ¼ cup of the mixture to form each pancake.

Tip: You know the pancakes are ready to flip when the edges of the pancakes lift up easily with the spatula.
Tip: If the pancakes are raw in the center then try cooking them a little longer at low heat with the lid.

For the cacao sauce. Put the water in a small pot at high heat and bring to boil. Once boiling, add the cacao and cook uncovered for 2 minutes at high heat, stirring occasionally, until you have a thick texture, then add the Stevia.

If you want a 10 for presentation from the judges, a pancake tower is very appealing! Put a pancake, cover in sauce, a layer of fruit, then repeat until you reach the desired height.

These would serve 2 on Phase 3, minus the strawberries.

Source:  Haylie Pomroy

Wonderful Walnuts: Benefits, Storing, Buying


5 ways walnuts boost health

1. Walnuts are amazingly anti-inflammatory, thanks to their omega-3 content and high levels of gamma tocopherol, a relatively rare form of vitamin E. Those omega-3 fatty acids — and probably other parts of the walnut, too — also help nourish your memory and thought processes.
2. They’re great for your entire cardiovascular system. Walnuts are known to improve your cholesterol levels, lower your C-reactive protein levels (an indicator of possible heart disease), boost the health of your blood vessels, and can also have positive effects on your blood pressure.
3. Walnuts help conquer belly fat. Not only does adding a reasonable amount of walnuts to your diet not cause weight gain, they can actually help you lose that hard-to-target belly fat.
4. Maybe diabetes, too. Great news for those with diabetes or metabolic syndrome: Walnuts can reduce your fasting insulin levels in a fairly short time.
5. Walnuts slow and prevent some cancers. Talk about a boost for both men and women. Walnuts can slow or prevent some breast cancers, plus prostate cancer, renal cancer, and colon cancer too. They also improve the markers of general prostate health.
Let’s not forget the nutrition! Walnuts are also packed with trace nutrients like copper and manganese, and the body-boosting minerals potassium, magnesium and calcium — although the actual mineral content varies quite a bit, depending on which walnut species you have.

Buying, storing and using walnuts

You’ll find shelled walnuts in bulk bins or bagged on the shelf — but if you can get them whole and then shell them yourself (with a nutcracker), you have a better chance of getting more of the sometimes flaky, sometimes waxy inner skin, which contains the vast majority of the walnut’s health-enhancing phenol's. Still, shelled or whole, walnuts are great for you.
As with all nuts, buy raw walnuts, which are quite easy to find.
If you’re buying whole walnuts, look for crack-free shells that feel heavy for their size. If you’re buying shelled walnuts, steer clear of anything that’s rubbery or wrinkled looking, or that bends instead of snapping cleanly if you try to break it.
Walnuts’ high healthy oil content means they actually can go bad, so do the sniff test before you buy; if they smell rancid, they’ll taste rancid too. Once you have your walnuts home, store them in the refrigerator for up to six months or the freezer for up to a year. Whole, un-shelled walnuts can last for up to six months in a dry, cool pantry.
Yum! How to eat walnuts
Walnuts are a great snack in their own right, especially during Phase 3 of the Fast Metabolism Diet. Or add chopped walnuts to oatmeal with berries and cinnamon, sprinkle them over a salad, or mix them into fruit salads. They’re especially great in fish dishes, with roasted beets, and in savory dishes like stuffing or wild rice.
There’s just one thing to watch out for with walnuts: They’re tree nuts, one of the most common food allergens out there. So if you think you might be sensitive or allergic to tree nuts, proceed with caution when it comes to walnuts — especially if you’re allergic to cashews or peanuts, which show some cross-reactivity with walnuts.
You might also want to give your doctor a heads-up about your walnut intake if you’re on medication for diabetes or if your blood glucose levels are being monitored since the walnuts can reduce your fasting insulin levels

Chocolate Zucchini Walnut Bread


Serves 8 | Phase 3

Ingredients

  • 1 ¼ cup raw almond flour (not blanched)*
  • ¼ cup raw cacao
  • ¼ teaspoon sea salt
  • ½ teaspoon baking soda
  • 1 teaspoon cinnamon
  • ¼ teaspoon nutmeg
  • 2 teaspoons orange zest
  • 2 large eggs, at room temperature
  • 2 tablespoons organic, unrefined coconut oil, at room temperature
  • ½ teaspoon liquid stevia
  • 1 cup grated organic zucchini
  • ¼ cup chopped raw walnuts

Instructions:

Preheat oven to 350. Lightly grease a 5” x 9” glass loaf pan with a little coconut oil or silicone pan.

Combine the almond flour, cacao, salt, baking soda, cinnamon and nutmeg in a food processor (you can also do this by hand). Pulse until combined.

Add eggs, one at a time, coconut oil and stevia. Pulse until all the ingredients are well mixed, then add zucchini and orange zest, pulsing until just combined.

Transfer to a bowl and fold in the walnuts. Bake for 30 to 35 minutes, or until a toothpick inserted into the center comes out clean. Cool completely before slicing. One 1-inch slice is a grain and a healthy fat serving for Phase 3.

*If you cannot find raw almond flour, you can easily make your own. Place raw almonds in a blender or food processor and pulse until you get a flour-like consistency. Don’t run the blender continuously or you’ll end up with almond butter!

Source:  Haylie Pomroy

Cilantro-Lime Pork Tacos


Displaying

PHASE 1  |  SERVES 4 

Ingredients:

  • 1 pound pork tenderloin, trimmed and cut into thin strips
  • 1 teaspoon cumin
  • 1 teaspoon chili powder
  • 1/4 teaspoon sea salt
  • 1/8 teaspoon freshly ground black pepper
  • 1 1/2 cups thinly sliced onion
  • 1 small jalapeño pepper, seeded and chopped
  • 1/2 cup chicken broth
  • 1/2 cup halved grape tomatoes, plus more for serving
  • 1/2 cup chopped cilantro
  • 2 1/2 tablespoons fresh lime juice
  • 4 6-inch sprouted-grain tortillas.*

Instructions:

Heat a large nonstick skillet over medium-high heat.

Sprinkle the pork with the cumin, chili powder, salt, and black pepper.

Add the pork, and sauté 4 minutes or until browned.  Transfer the pork to a bowl.

Add the onion and jalapeño to pan; sauté 3 minutes or until crisp-tender.  Add the broth, reduce the heat, and simmer 1 minute, scraping the pan to loosen browned bits. Stir in 1/2 cup tomatoes; simmer 2 minutes.

Return the pork and accumulated juices to pan.  Stir in 3 tablespoons of the cilantro and the lime juice; cook 1 minute or until the pork is done.

Heat the tortillas according to package directions.

Divide the pork mixture among the tortillas, top with extra tomatoes and the rest of the cilantro, and roll up.

Source:  Haylie Pomroy

Sunday, September 11, 2016

Slow Cooker Wild Rice Stuffing

Crock Pot Stuffing

Ingredients


  • 3/4 c. olive oil
  • 2 c. chopped onion
  • 2 c. celery
  • 1/2 lb mild sausage
  • 2 cans cooked wild rice (I use Canoe brand)
  • 1/4 c. chopped parsley
  • 2 (8 oz) cans mushrooms
  • 1 tsp poultry seasoning
  • 3 c. chicken broth
  • 16 c. dry bread cubes
  • 1 1/2 tsp salt 
  • 1 1/2 tsp sage
  • 1/2 tsp pepper
  • 2 eggs, beaten

Instructions

Saute onions, celery, and sausage until done.  Drain off fat and add olive oil.  Add parsley, wild rice and mushrooms.

Place bread crumbs in a large bowl. Pour onion/sausage  mixture over bread cubes, add seasonings and toss together. Stir in broth. Add beaten eggs and mix together.

Pack stuffing lightly into greased slow cooker. Cook on high for 45 minutes. After 45 minutes reduce to low for 4 hours.

Source:  Adapted from julieseatandtreats.com

Cranberry Apple Pecan Wild Rice Pilaf

Easy one pot Cranberry Apple Pecan Wild Rice Pilaf simmered in herb seasoned chicken broth and apple juice and riddled with sweet dried cranberries, apples and roasted pecans for an unbelievable savory sweet side dish perfect for the holidays. Everyone always asks for this recipe!

This Cranberry, Apple, Pecan Wild Rice is perfect for the holidays, company, or just to exceed your everyday deliciousness quota and even more perfect because its cooked in one pot and there is hardly any “hands on” time.

Ingredients

  • 1 1/2 cups low-sodium chicken broth
  • 1 1/2 cups apple juice
  • 1 tablespoon Dijon mustard
  • 3 tablespoons butter, divided
  • 1/2 teaspoon salt
  • 1/4 teaspoon pepper
  • 1/2 teaspoon dried parsley
  • 1/4 teaspoon dried oregano
  • 1/4 teaspoon dried thyme
  • 1 bay leaf
  • 1 cup wild rice blend, rinsed and drained*
  • 1/2 large onion, diced
  • 1 Fuji or Honey Crisp apple, chopped
  • 3 garlic cloves, minced
  • 2 teaspoons apple cider vinegar
  • 1/2 cup dried cranberries
  • 1/2 cup chopped pecans, toasted

Garnish (optional)

  • fresh thyme
  • fresh parsley

Instructions

Bring broth, apple juice Dijon, 1 tablespoon butter, salt, pepper, dried thyme, oregano, parsley and bay leaf to a boil in a large nonstick skillet. Add rice, cover and reduce heat to low (dial should be just above lowest LOW setting).

Simmer 45-60 minutes or until rice is tender and almost all of the liquid has been absorbed, checking rice for doneness at 45 minutes. Once cooked, drain rice and leave in fine hole strainer.

To the now empty pan, melt 2 tablespoons butter over medium heat. Increase heat to medium high and add onions and apples; saute for 5-7 minutes, or until onions and apples are tender. Add garlic and saute for 30 more seconds.

Return rice to skillet along with cranberries, pecans and apple cider vinegar. Toss to evenly combine. Season with additional salt and pepper to taste. Garnish as desired.

*  For an easier method, buy the Canoe canned wild rice.  It's about $4 can but saves a lot of time and is very good too. Plus wild rice can smell up the house too when it's cooking (another bonus).  Look for it on sale throughout the year and stock up to make soup and dishes like this one.  You can find it as cheap at a couple of bucks a can.

Source:  Carlsbad Cravings

Best Slow Cooker French Dip


 5 minute prep Crazy tender Slow Cooker French Dip Sandwiches seeping with spices are unbelievably delicious and make the easiest dinner or party food. You haven't had French Dip Sandwiches until you try these! absolutely the best!

Serves: 6 servings

Ingredients

  • 1 3 lb. beef chuck roast, trimmed of excess fat*
  • 1 tablespoon olive oil
  • 6 French rolls or hoagie buns
  • 12 slices provolone cheese

Slow Cooker

  • 1/3 cup reduced-sodium soy sauce
  • 1 cup Coke, NOT diet
  • 2 10.5 oz. cans beef consommé**
  • 1/4 cup dry minced onions
  • 1 tablespoon beef bouillon
  • 1 teaspoon garlic powder
  • 1/2 teaspoon onion powder
  • 1/2 teaspoon dried oregano
  • 1/2 teaspoon salt
  • 1/4 teaspoon pepper
  • 1/4 teaspoon dried thyme
  • 1 bay leaf
Crazy tender Slow Cooker French Dip Sandwiches seeping with spices are unbelievably delicious and make the easiest dinner or party food. You haven't had French Dip Sandwiches until you try these! absolutely the best!Crazy tender Slow Cooker French Dip Sandwiches seeping with spices are unbelievably delicious and make the easiest dinner or party food. You haven't had French Dip Sandwiches until you try these! absolutely the best!


Instructions

Heat olive oil over medium high heat in a large nonstick skillet. Using two forks or tongs to hold roast, sear on all sides until lightly browned. Add to slow cooker and top with all remaining Slow Cooker ingredients.

Cook on LOW for 4 hours then remove roast to a cutting board. Thinly slice roast across the grain. Place sliced meat back in slow cooker and continue to cook on LOW for 1-2 additional hours.
When ready to serve, remove roast and strain fat from broth for dipping.

Split rolls and line the bottoms on a baking tray. Top each half with beef followed by 2 slices cheese. 
Bake at 350 degrees F or until cheese is melted. Serve with reserved au jus.

NOTES
*The beef can be more or less than 3 pounds, but 3 pounds is roughly the amount for 6 sandwiches.
**Beef consomme can usually be found in the canned section next to the beef broth. If you can't find it, you may substitute beef broth.

Source:  Carlsbad Cravings