Find What You're Looking For:

Showing posts with label "DAIRY". Show all posts

Wednesday, June 11, 2025

Coffee Creamer KETO (Jen)*


    Those creamers you buy in the store are full of junk.  Yuck.  Make your own so at least you can read the label! This creamer is so thick and delicious!
    Share this post and let’s spread the joy of authentic home cooking! 

    ~ * ~ * ~ * ~
    🧡 Let's Get Cooking! 🧡
    ~ * ~ * ~ * ~


SERVINGS: 10-12
Calories 51 | Fat 0.3g | Protein 0.1g | Net Carbs 2.1g 


Ingredients :
    • 3 cups of water
    • 1/2  a cup of cashews 
    • raw half a cup of raw walnuts
    • 3 Medjool dates
    • Ceylon cinnamon 
    • 3 pinches salt
    • 1/2 T Madagascar bean vanilla powder
Instructions :
      • Add all ingredients to a blender and blend well.  Pour into a carafe and store in the refrigerator for up to a week.
Source: Jen


Friday, September 6, 2024

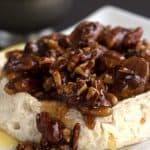
Baked Brie with Pecan Praline Sauce KETO (Carolyn)


This easy baked brie recipe is drizzled with a sugar-free caramel pecan sauce for a one-of-kind keto appetizer. Sweet and savory, and so easy to make, it's the perfect last minute appetizer for any get together. 

Share this post and let’s spread the joy of authentic home cooking! 

~ * ~ * ~ * ~
Let's Get Cooking!
~ * ~ * ~ * ~

Open ClipTo

Clip Highlight

Clip Page

Clip Note

Sunday, June 26, 2016

Coconut Whipped Cream

Serves: 1 cup

Ingredients

  • 1 (13-ounce) can coconut milk
  • 1 tablespoon honey
  • 1 teaspoon vanilla extract
  • 5 drops vanilla stevia
  • pinch of sea salt

Instructions

Place the can of coconut milk in the refrigerator at least 24 hours before making the whipped cream, so it is well chilled.

Chill a metal bowl in the freezer for 15 minutes.

Take the coconut milk out of the refrigerator turn upside down and remove the lid. The liquid should have settled to the bottom of the can so it's easy to pour the remaining liquid into a glass jar and store in the refrigerator, saving it for another use.  

Then, gently scoop out the coconut fat, placing it in the chilled bowl.


Using a hand mixer, whip the coconut milk fat until light and fluffy, about 1 minute.

Whip in the honey, vanilla extract, stevia, and salt.

Use right away or store in a glass jar in the refrigerator for up to 24 hours

Source:  Elana's Pantry

Tuesday, March 29, 2016

Salted Caramel Ice Cream

Salted Caramel Ice Cream I One Lovely Life


While most homemade ice cream does best when it’s only been frozen a few hours, the caramel in the ice cream will keep it soft, so this needs several hours to freeze and harden, so I recommend making it in the morning before you plan on eating it for dessert, or you can even make it the day before you plan on eating it. The caramel can be made 2-3 days ahead of time and the custard can be made the day before you plan on churning and freezing it.

Makes about 1¼ quarts.
Special Equipment:  Ice Cream Maker

INGREDIENTS

For Salted Caramel:

  • 6 Tbsp butter
  • ¾ cup sugar
  • 1 cup cream
  • 1tsp salt
  • 1 tsp vanilla
  • For ice cream:
  • 2½ cup cream
  • ⅔ cup sugar
  • 4 eggs
  • ¼ tsp salt
  • 2 tsp vanilla

INSTRUCTIONS

For the salted caramel:
Melt butter in a Dutch oven or heavy-bottomed pan over medium heat. Stir in sugar and continue cooking over medium heat, stirring regularly until golden brown (it should be a little darker than peanut butter). Remove from heat.

Stir in half of the cream (be careful--this can cause the caramel to bubble and sputter). Stir in the remaining cream, salt, and vanilla. Your caramel may have seized (mine did) and clumped up. Don't panic, it's still okay. If you have any lumps remaining, return pan to very low heat and stir until smooth. If there are any remaining small clumps, you can sieve them out.

You should have about 1¼ cup caramel.  Refrigerate until ready to use.

For the ice cream:
In a large saucepan, combine cream and sugar. Heat to a simmer over medium heat.

In a medium bowl, whisk together eggs and salt. Whisk about ½c of the cream mixture into the egg mixture to temper the eggs. Continue whisking, and pour in the remaining cream mixture in small increments.

Pour the custard back into the large saucepan and heat over medium-low heat until thickened slightly. Remove from heat and transfer to a bowl. Cover bowl with plastic wrap and refrigerate until completely cooled.

When custard is chilled, pour into an ice cream mixer and process according to manufacturer's directions (for my Cuisinart, I churned the ice cream for 30 minutes). Pour ice cream into a freezer-safe container and pour salted caramel over all. Swirl caramel into the ice cream with a butter knife. Cover and freeze at least 3 hours, or until firm.

NOTES
The salted caramel can be made up to 3 days ahead of time and stored in the refrigerator. When ready to use, heat in the microwave about 30 seconds, just to make it easy to stir. It's okay if it's a little stiff.

Source: Adapted from One Lovely Life

Chocolate Truffle Ice Cream - No Machine

Deeply fudge ice cream 
without an ice cream maker!
(No-Machine) Chocolate Truffle Ice Cream // One Lovely Life 
I’d never tried making ice cream without the machine, and I wasn’t sure whether or not it would really work. I pictured something icy and hard. NOT SO. This stayed fudge-y and still scoop-able for a few days in the freezer (that’s as long as it lasted). I found that, unlike most ice cream (especially homemade ice cream), as it warms up, it doesn’t become soupy, but instead really feels and tastes like a truffle. It’s also rich like a truffle, so a little goes a long way.

Feel free to play with the flavoring here. Instead of almond extract, why not try a bit of orange zest? Or,  you could stir in some chopped, toasted hazelnuts. 
The possibilities are endless.

Serves: 7-8 small servings

INGREDIENTS

  • 1 (14oz) can sweetened condensed milk
  • ¾ cup heavy cream
  • ¾ cup whole milk
  • 6 oz bittersweet chocolate, chopped (I used Ghiradelli 60% chips, chopped)
  • ¼ cup unsweetened cocoa powder, sifted (to prevent lumps)
  • 5 tsp cornstarch
  • 2 Tbsp water
  • 1 tsp vanilla
  • ¼ tsp almond extract
  • ¼ tsp sea salt (less if using table salt)

(No-Machine) Chocolate Truffle Ice Cream // One Lovely Life

INSTRUCTIONS

In a medium saucepan, whisk together sweetened condensed milk, cream, and whole milk over medium heat. Whisking often, bring mixture to a boil over medium heat. Remove from heat.

Immediately, stir in bittersweet chocolate and cocoa powder and whisk until very smooth. In a small bowl, whisk together cornstarch and water, then pour into chocolate mixture.

Return saucepan to medium heat and bring to a simmer, stirring almost constantly, until mixture has thickened, about 5 minutes. Remove from heat and stir in vanilla, almond, and salt.

Pour mixture into a glass bowl. Let cool about 5 minutes before covering with plastic wrap. Chill in the refrigerator until completely cooled, several hours or overnight. Mixture will be very thick.

To freeze, transfer chilled chocolate mixture into an airtight container. Press plastic wrap onto the surface, then seal with a lid. Freeze several hours until firm enough to scoop (this should only take about 2 hours, but you can do it up to a day before serving).

Remove from freezer 5-10 minutes before scooping. A little goes a long way!

NOTES
Variations: feel free to substitute ½ tsp orange zest for the almond extract, or stir in a handful or two of chopped, toasted nuts (hazelnuts or almonds would be nice).

Source: Adapted from One Lovely Life


Sunday, March 27, 2016

The Best Paleo Ranch Dressing and Mayo

Paleo Ranch Dressing (+ Mayo!) // One Lovely Life

Making mayonnaise doesn’t have to turn into an endurance test of your whisking abilities, thanks to the help of common kitchen tools. Making mayonnaise by hand with only your arm, a bowl and a whisk can certainly impress a few and makes for less cleaning, but it can frankly be exhausting and very frustrating if the mayonnaise ends up breaking. Using either a blender, food processor or handheld immersion blender is the easiest way to whip up a perfect mayonnaise every time.

Fixing a broken mayonnaise:
A mayonnaise becomes broken if the oil is incorporated too fast with the mixture of eggs and becomes liquid and lumpy. Fortunately though, fixing a broken mayonnaise is not as complicated as it may seem. Simply take out a new bowl, add in an egg yolk and 1 tsp of fresh lemon juice and then slowly whisk or blend in your broken mayonnaise.

Serves: about 1 cup

INGREDIENTS

For the mayonnaise:

  • 1 cup avocado oil, olive oil, or a mixture
  • 1 egg yolk
  • 1 Tbsp dijon mustard
  • Juice of ½ a lemon
  • ½ tsp salt

For the ranch dressing:

  • 1 cup mayonnaise (see above or substitute your favorite recipe)
  • ¼ cup coconut milk
  • 1 tsp apple cider vinegar
  • ½ tsp onion powder
  • ½ tsp garlic powder
  • 1 Tbsp fresh dill or 1 tsp dried dill and/or some parsley, cilantro, rosemary
  • salt and pepper, to taste.

INSTRUCTIONS

For the Mayonnaise:

Place the egg yolks, 1 tsp of the lemon juice, the mustard and the pinch of salt in a bowl or in the bowl of your food processor or blender.
Start whisking/blending everything together and then start slowly drizzling the oil in.

Continue pouring in the oil slowly, but steadily. An emulsion will eventually start to form and you’ll be able to pour in the oil more quickly.
Using a blender, immersion blender or food processor make it very easy, but if you decide to whisk it by hand you’ll have to whisk quite vigorously for the whole process to prevent the mayonnaise from separating.

Your mayonnaise should be quite thick when all the oil is incorporated and you can then add the remaining lemon juice and blend it in with the mayonnaise.

This mayonnaise will keep covered in the refrigerator up to 1 week. It's great for chicken or egg salad, on a sandwich, or in creamy salad dressings.

For the ranch dressing:

For every 1 cup of mayonnaise (the recipe above will yield the right amount), add 3 Tbsp coconut milk, cider vinegar, onion and garlic powders, and dill. Stir to mix well. Add additional coconut milk as needed to thin the mixture (it will naturally thicken somewhat in the refrigerator). Taste and add salt and pepper as desired.

Ranch dressing will keep 1 week covered in the refrigerator.

Here’s a simple chicken salad we prepared with this batch of mayonnaise. We simply used some leftover cooked chicken that we shredded by hand with some diced celery, diced onions, snipped chives as well as some paprika, salt and pepper:
Chicken salad

Source: Adapted from One Lovely Life and Paleo Leap

Wednesday, March 23, 2016

Coconut Sour Cream

The Best Vegan Sour Cream:

Makes about 1/2 cup | Prep time: 5 min.

Ingredients

  • Cream from 1 15-ounce can coconut milk
  • 1 or 2 tablespoons lemon juice
  • 1/8 teaspoon sea salt

Directions

In a medium bowl, whisk together the coconut cream, lemon juice and salt until combined.

Adjust salt to taste and add more lemon, if desired.

Refrigerate for about an hour before serving to allow flavors to combine.

Depending on the coconut milk you buy, your sour cream might end up a little grainier than dairy sour cream. You can also strain it through a fine sieve if you want it extra smooth. That’s it!

Source:  Haylie Pomroy

Easy-Peasy Nacho Cheesy Dip


Makes about 1 1/2 cups | Prep time: 15 minutes | Total time: About 3 hours (including soaking time)

Ingredients

  • 1 1/2 cups orange or red bell pepper (or a combination)
  • 1/2 tsp. garlic, minced
  • 1 cup raw cashews, soaked in water at least 2 hours
  • 1 tsp. sea salt
  • 1/4 cup nutritional yeast
  • 1/4 tsp. turmeric powder
  • 1/4 tsp. onion powder
  • 1/2 tsp. dry mustard
  • 1/4 cup canned green chilies
  • 1/4 cup olive oil

Directions

Core, seed and chop the peppers and add them to a blender.

Add the garlic, green chilies, cashews and spices.

Blend until smooth and creamy, about 5 minutes (depending on the power of your blender).

Once smooth, drizzle in the olive oil until just combined. Taste and adjust seasonings if desired.

Store the cheese in an airtight glass container in the fridge for up to a week.
If you’re following the Fast Metabolism Diet, three tablespoons would count as a healthy-fat portion.

Source:  Haylie Pomroy

Power Protein Herb Vegetable Dip

Lemon-Herb Dip:
Phase 1, 2, 3

Makes 1 Cup | Prep Time: 10 minutes | Total Time: 10 minutes

Ingredients
  • 3 hard-boiled egg whites
  • 1 clove garlic
  • 2 tablespoons fresh lemon juice
  • 2 tablespoons water or almond milk unsweetened
  • 1 tablespoon minced fresh dill
  • 1 tablespoon minced fresh cilantro
  • 1 tablespoon minced fresh scallions or chives
  • 2 teaspoons onion powder
  • 1 teaspoon sugar-free Dijon mustard
  • ¼ teaspoon sea salt
  • 1⁄8 teaspoon freshly ground black pepper
  • 3 drops liquid stevia
Directions

Process everything in a blender or food processor until smooth. Serve with Phase appropriate
veggies.

About ½ cup is a protein portion for a Phase 2 snack.

Source:  Haylie Pomroy

Saturday, February 13, 2016

Coconut Butter

Paleo Coconut Butter

The process is simple – add in 6 cups of coconut flakes and start blending on high (you need a minimum of around 3 cups of coconut flakes for it to work). When the flakes get stuck to the sides of the blender, turn off the blender and use a spoon to push the flakes down. Repeat 3 times. Then add in 2 tablespoons of melted coconut oil (you can melt it in the microwave) and blend on high for 10 minutes.

This works more consistently if you start with only about 4 cups of shredded coconut.  Make that into a butter and then add 1 cup of additional coconut at a time, blending to a butter with the addition of each cup.
It’s as simple as that!

And how creamy and sweet tasting!  It will come out quite warm and runny, but it will harden up as you let it sit.  If you need to speed up the process, just put it into your fridge or freezer (or outside if it is winter.

Your coconut butter will become spreadable around 76 degrees, but you can use a knife or apple corer to get it out of the jar if it is colder than that in your home (it sure is in mine in the winter).


Vegan Parmesan Cheese

Vegan Parmesan Cheese enhances so many dishes. There are only four ingredients and it only takes about 5 mins. Sprinkle it on pasta, soups, salads and more.

Prep Time: 5 minutes
Total Time: 5 minutes
Yield: 1 cup
Serving Size: what you like
Source: Vegan Freezer

Ingredients

  • 1 cup raw cashews
  • 1/4 cup nutritional yeast
  • 1/2 teaspoon sea salt
  • 1/4 teaspoon garlic powder

Directions

Add all of the ingredients to a food processor.

Pulse until a fine crumb mixture forms. Literally seconds.

Use in just about any savory dish you can think of.

Keep in the refrigerator for about a month or keep in the freezer in a freezer container for up to 12 months.

Cashew Cheddar Cheese Spread


Cashew Cheddar Cheese Spread is simple and versatile. The sharp flavor of cheddar but no dairy! Use it in casseroles, Mexican style dishes and party food.

Prep Time: 4 hours, 10 minutes
Total Time: 4 hours, 10 minutes
Yield: 3 Cups
Serving Size: Whatever you Like

Ingredients

  • 2 cups raw cashews
  • 1/2 cup water
  • 1/2 cup nutritional yeast
  • 1/4 cup lemon juice
  • 2 teaspoons dijon mustard
  • 1/2 teaspoon garlic powder
  • 1/2 teaspoon sea salt
  • 1/4 teaspoon ground black pepper

Directions

Soak the cashews for about 4 hours and then drain.

Place all ingredients into a blender and blend until it is smooth and creamy.

Just wait until you taste it!

The spread will keep in the refrigerator for about 1 week.

You can also freeze it.

IF FREEZING:

Please follow any of the directions defined in my article Preparing Food for the Freezer

TO PREPARE AFTER FREEZING:

Put in the fridge the day before using. Stir and use in any manner that you like.

Ranch Dressing (made from cashews)


Dairy Free Ranch Dressing - rich and creamy and simple to make from scratch. Fun and creative then use it on tacos, appetizers, salads and as a dip.

Prep Time: 10 minutes
Total Time: 10 minutes
Yield: 1 1/2 cup dressing
Serving Size: whatever you like
Source: Vegan in the Freezer

Ingredients
  • 1 cup cashews, soaked for at least 4 hours
  • 3/4 cup Almondmilk Light
  • 3 tablespoons apple cider vinegar
  • 1 tablespoon maple syrup (stevia)
  • 2 teaspoons onion powder
  • 1/2 teaspoon dried parsley
  • 1/2 teaspoon dried chives
  • 1/2 teaspoon dried dill weed
  • 1/4 teaspoon ground black pepper


Directions

Put the soaked cashews in a food processor. Add all of the remaining ingredients. Process until smooth.

Add more almond milk, if needed, to get the consistency of dressing.

The flavors will meld after resting in the refrigerator.for a couple of hours but you can still use it immediately.

Pour into container and store in refrigerator.

This will keep in the refrigerator for about 2 weeks.