Find What You're Looking For:

Thursday, December 22, 2016

Cranberry-Orange Cheesecake


  • Makes: 16 servings
This holiday dazzler from Big Cedar Lodge in Ridgedale, Missouri, tastes as good as it looks. The dark chocolate cookie crust and ruby-red berries add dramatic flair to the orange-flavor filling. Since the cake keeps well for two days, this is a great make-ahead dessert.

Ingredients

Crust
  • 1 9 - ounce package chocolate wafer cookies, broken (GF: choose gluten free wafers)
  • 2 ounces bittersweet or semisweet chocolate, coarsely chopped
  • 5 tablespoons unsalted butter, melted
Filling
  • 4 8 - ounce package cream cheese, softened
  • 1 1/2 cups sugar
  • 3 tablespoons all-purpose flour
  • 2 teaspoons finely shredded orange peel
  • 1 teaspoon vanilla
  • 4 eggs
Topper
  • 1/2 cup sugar
  • 1 teaspoon cornstarch
  • 3 tablespoons water
  • 2 cups fresh cranberries
  • 1/2 teaspoon finely shredded orange peel
Instructions

Crust: 
In a food processor, combine cookies and chocolate. Cover; process until finely ground. Add butter. Cover; process with on/off turns until moist clumps form. If you like, use plastic wrap as an aid to press crumb mixture onto the bottom and about 1 1/4 inches up the sides of a 9-inch springform pan (with 2 3/4-inch-high sides). Bake in a 325 degrees F oven about 8 minutes or until set. Remove from oven; cool completely.

Increase oven temperature to 350 degrees.

Wrap two layers of heavy-duty foil around bottom and up the sides of the springform pan.

Filling: 
In an extra-large mixing bowl, beat cream cheese with an electric mixer on medium to high speed until smooth. Add 1 1/2 cups sugar, the flour, 2 teaspoons orange peel and the vanilla. Beat cream cheese mixture until well combined. Add eggs, one at a time, beating on low speed just until combined.

Pour filling into crust-lined pan. 

Place springform pan in a large roasting pan. (Make sure there is a least 1 inch between springform pan and edges of roasting pan.)

Place roasting pan on oven rack. Carefully pour enough hot tap water into roasting pan to come halfway up the sides of the springform pan.

Bake in a 350 degrees F oven for 60 to 70 minutes or until edge of cheesecake is firm and center appears nearly set when lightly shaken. 

Remove pan from water bath; transfer to a wire rack and cool 15 minutes. Remove foil. Use a small metal spatula to loosen cheesecake from sides of pan. Cool for 30 minutes more. Remove sides of pan and cool about 2 hours or until completely cooled. Cover cheesecake with plastic wrap and chill overnight before serving.

(Can be stored in refrigerator for up to 2 days.)

Topping: 
In a medium saucepan, combine 1/2 cup sugar and the cornstarch. Stir in the water. Cook and stir over medium-low heat until thickened and bubbly. Add cranberries. Bring to boiling; reduce heat. Boil gently, uncovered, over medium-high heat for 3 to 4 minutes or until cranberries pop, stirring occasionally. Stir in the 1/2 teaspoon orange peel. Remove from heat; cool completely. Cover and chill overnight. (Can be stored in refrigerator for up to 2 days.)

To serve, top cheesecake with cranberry topping. Cut into wedges. If you like, clean knife between each cut.

Source:  Midwest Living


Eggnog (Healthy)

Image result for eggnog

Share this post and let’s spread the joy of authentic home cooking! 

~ * ~ * ~ * ~
Let's Get Cooking!
~ * ~ * ~ * ~

Serves 6

Ingredients :

  • 4 beaten egg yolks
  • 3 cups unsweetened almond or coconut milk, divided
  • 1 teaspoon vanilla
  • 3/4 teaspoon powdered stevia, or to taste
  • 1/2 teaspoon ground cinnamon
  • 1/2 teaspoon ground nutmeg

Instructions :

  • In a medium saucepan, mix the egg yolks and 2 cups of the milk.
  • Stir constantly over medium-low heat until the mixture thickens enough to coat the back of a spoon, about 5 to 10 minutes. (Be patient — if you heat things too fast or don’t stir, you’ll get scrambled eggs!)
  • Remove the pan from the heat and set it in a bowl of ice water.
  • Stir for 2 to 3 minutes and then add the last 1 cup of milk, vanilla, stevia, cinnamon, and nutmeg.
  • Cover the eggnog and refrigerate.  The longer it chills, the thicker it will get.
  • Before serving, dust the eggnog generously with cinnamon and nutmeg.

Source:  HayliePomroy

Slow-Roasted Beef Tenderloin with Thyme


Ingredients:

  • 1 whole beef tenderloin (about 6 lb.)
  • Kosher salt and freshly ground black pepper
  • About 25 sprigs fresh thyme

Instructions:

Heat the oven to 250°F. 

Season the beef generously with salt and pepper. Fold the thin tail piece under itself to create a roast of even thickness. 

Using twine, tie the beef at regular intervals to help it hold its shape during cooking. Tuck the thyme beneath the twine all the way around the beef, spacing the sprigs about 2 inches apart. 

Put the beef in a roasting pan and roast until an instant-read thermometer inserted into the thickest part reads 130°F for medium rare, 1-3/4 to 2 hours. 

Transfer to a carving board, tent with foil, and let rest for 30 minutes. Just before serving, carve into 1/2 inch slices.  

Thursday, December 15, 2016

Cheesy Potatoes *


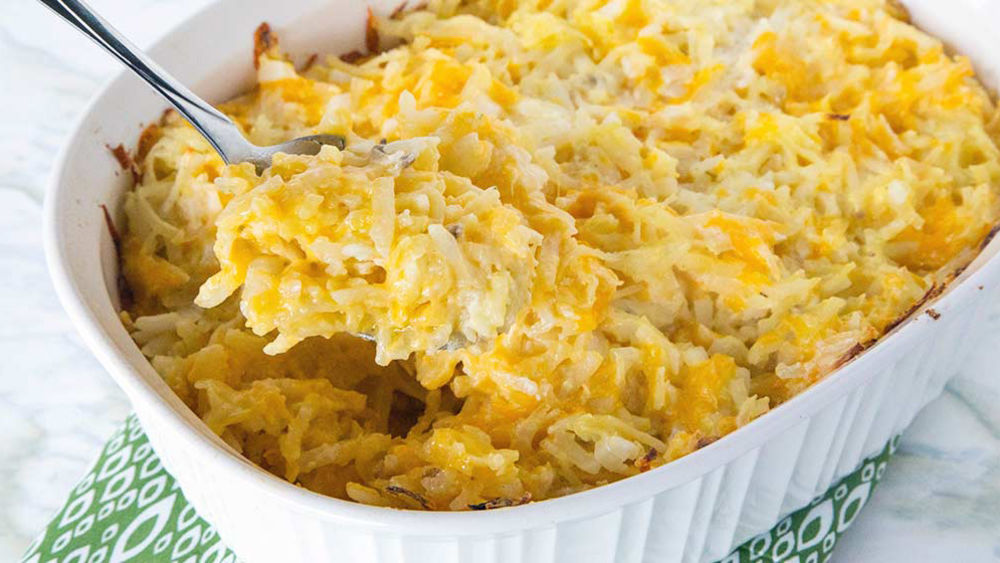
Cheesy Potato Casserole

I first had a version of these when my oldest daughter was a baby at Christmas and ever since, I have been making these, especially for the holidays.  I have tweaked them a bit, because that's what I do. It's always a favorite with everyone.  If you don't have room in your oven, you can always put them in the crock pot too.  You could add diced ham for a complete meal.  

Definitely not low calorie or low fat!  But it's the holidays after all...

Ingredients

  • 1 pint (2 cups) sour cream 
  • 1 can (10 3/4 oz) condensed cream of chicken soup or cream of potato 
  • 1 tablespoon garlic powder
  • 1 cup chopped onions
  • 1 bag (30 oz) frozen country-style shredded hash brown potatoes, partially thawed 
  • 2 cups shredded Cheddar cheese (8 oz)
  • 1 package softened cream cheese
  • pinch of sea salt and fresh ground pepper

Instructions

Heat oven to 350°F.

In large bowl, combine 1 pint (2 cups) sour cream, 1 can (10 3/4 oz) condensed cream of chicken soup, cream cheese, 1 tablespoon garlic salt, 1 cup chopped onions, 1 bag (30 oz) frozen country-style shredded hash brown potatoes, partially thawed, and 2 cups shredded Cheddar cheese (8 oz); stir until well blended.

Pour into ungreased 13x9-inch (3-quart) glass baking dish.  Bake 45 minutes.

Source:  Me

Hot Artichoke and Spinach Dip


Image result for spinach artichoke dip

Ingredients

  • 1 (8 ounce) package cream cheese, softened
  • 1/4 cup mayonnaise
  • 1/4 cup grated Parmesan cheese
  • 1/4 cup grated Romano cheese
  • 1 clove garlic, peeled and minced
  • 1/2 teaspoon dried basil
  • 1/4 teaspoon garlic salt
  • salt and pepper to taste
  • 1 (14 ounce) can artichoke hearts, drained and chopped
  • 1/2 cup frozen chopped spinach, thawed and drained
  • 1/4 cup shredded mozzarella cheese

Instructions

Preheat oven to 350 degrees F (175 degrees C). Lightly grease a small baking dish.

In a medium bowl, mix together cream cheese, mayonnaise, Parmesan cheese, Romano cheese, garlic, basil, garlic salt, salt and pepper. Gently stir in artichoke hearts and spinach.

Transfer the mixture to the prepared baking dish. Top with mozzarella cheese. Bake in the preheated oven 25 minutes, until bubbly and lightly browned.

Source:  Allrecipes.com

True Swedish Meatballs (Svenska Kottbullar) - Nikki *

Image result for swedish meatballs

This has always been a Christmas staple in my family since I can remember.  Growing up in a VERY Scandinavian family celebrating Christmas dinner with pickled herring, lefse, fruit soup, potatoes in white sauce and even lutefisk (it smells awful!).  Our favorite, hands down, were the Swedish meatballs.  

Yields:  5 Dozen

Ingredients:
  • 1 cup minced onion
  • 1 tablespoon butter
  • 2.5 pounds meat loaf mixture, ground beef, pork, and veal
  • 1 cup fresh bread crumbs (GF: use GF bread, toast and put in blender or processor for crumbs)
  • 3 Eggs, slightly beaten
  • 1 1/2 cups half-and-half
  • 2 teaspoons salt
  • 1/2 teaspoon dried dill weed
  • 1/4 teaspoon Black Pepper
  • 1/4 teaspoon ground nutmeg
  • 1/4 teaspoon ground allspice
  • 1/4 teaspoon ground cardamom
  • 3 tablespoons butter
  • 1/3 cup Flour (GF: Bob's Red Mill 1:1)
  • 2 cans beef broth, 10.5oz
  • 1 cup whipping cream

Instructions:

In small skillet, cook onion in 1 tablespoon butter until soft.

In large bowl, combine onion with next 10 ingredients. (Mixture is very soft). Shape into 1 1/2-inch balls; arrange on jelly-roll pan lightly sprayed with vegetable cooking spray. Bake in a preheated 400 F oven until cooked through and lightly browned (14-16 minutes).

Meanwhile, melt 3 tablespoons butter in large skillet; stir in flour. Gradually whisk in beef broth. Cook over medium heat, stirring constantly, until mixture thickens. Stir in whipping cream and 1/2 teaspoon dill weed; simmer 5 minutes. (Have gravy finished when meatballs come out of oven.)

Scrape meatballs and browned bits into gravy; stir to combine. Spoon into 3-quart casserole. Refrigerate, covered, several hours or overnight.


Reheat in a preheated 325 F oven until heated through (40-50 minutes).

Notes:  
You could brown them on the stove too but it is messy, in the oven is so much easier. 

I either serve them in the baking dish or you could even put them in a crock pot on low for 4 hours before serving or in a chafing dish.  But make sure they are baked first in the sauce and then added to the chaffing dish to keep warm.

Source:  Me adapted from Byerlys

Biscotti: Lemon-Almond


Image result for lemon biscotti

Share this post and let’s spread the joy of authentic home cooking! 

~ * ~ * ~ * ~
Let's Get Cooking!
~ * ~ * ~ * ~

Ingredients:
  • 6 tablespoons butter
  • 2/3 cup granulated sugar
  • 1/4 teaspoon salt
  • grated rind of 1 medium lemon (about 1 tablespoon)
  • 3/4 to 1 1/4 teaspoons almond extract, to taste*
  • 1 1/2 teaspoons baking powder
  • 2 to 3 tablespoons freshly squeezed lemon juice, to taste
  • 2 large eggs
  • 2 cups All-Purpose Flour (G:  Bob's Red Mill GF 1:1)
  • 3/4 cup chopped almonds
*3/4 teaspoon will give you the merest hint of almond; if you're fond of that flavor, use the greater amount of extract.

GLAZE (OPTIONAL)
  • 1/2 cup confectioners' or glazing sugar
  • 1 1/2 teaspoons lemon juice
  • 2 to 3 teaspoons milk

Instructions:
  • Preheat the oven to 350°F. Lightly grease (or line with parchment) one large (about 18" x 13") baking sheet.
  • In a medium-sized bowl, beat the butter, sugar, salt, lemon rind, almond extract, and baking powder until the mixture is smooth and creamy. Beat in the lemon juice and eggs; the batter may look slightly curdled. At low speed of your mixer, add the flour, stirring until smooth; the dough will be sticky.
  • Scrape the dough onto the prepared baking sheet. Shape it into a log that's about 13" long x 3" wide x 3/4" thick. Straighten the log, and smooth its top and sides; a wet spatula or wet bowl scraper works well here.
  • Bake the dough for 25 minutes. Remove it from the oven, and allow it to cool on the pan anywhere from 10 to 25 minutes; just work it into the schedule of whatever else you're doing in the kitchen. Reduce the oven heat to 325°F.
  • Using a spray bottle filled with room-temperature water, lightly but thoroughly spritz the log, making sure to cover the sides as well as the top. Softening the crust just this little bit will make slicing the biscotti much easier.
  • Wait another 5 minutes, then use a serrated knife to cut the log crosswise into 1/2" slices. As you're slicing, be sure to cut straight up and down, perpendicular to the pan; if you cut unevenly, biscotti may be thicker at the top than the bottom, and they'll topple over during their second bake.
  • Set the biscotti on edge on the prepared baking sheet. Return the biscotti to the oven, and bake them for 30 to 35 minutes, until they feel very dry and are beginning to turn golden around the edges. Remove the biscotti from the oven, and transfer them to a rack to cool.

To make glazed biscotti: 
  • Combine the confectioners' or glazing sugar with the lemon juice powder and milk; drizzle over cooled biscotti.
  • Store completely cool biscotti at room temperature, well wrapped, for a couple of weeks. Freeze for longer storage.

Source:  King Arthur Flour (5 stars)

Biscotti: Dried Cherry and Almond Biscotti


Image result for dried cherry and almond biscotti

Share this post and let’s spread the joy of authentic home cooking! 

~ * ~ * ~ * ~
Let's Get Cooking!
~ * ~ * ~ * ~

Yield: 44 biscotti

Ingredients :
  • 1 stick butter, at room temperature
  • 1 cup sugar
  • 2 eggs, plus 1 egg white
  • 1 teaspoon vanilla extract
  • 2 cups flour (GF: Bob's Red Mill GF 1:1)
  • 1 teaspoon baking powder
  • Pinch salt
  • 1 lemon, zested
  • 1/2 cup whole blanched almonds, toasted
  • 3/4 cup dried cherries
  • 2 tablespoons turbinado sugar
  • Chocolate Ganache, optional, recipe follows
  • 4 dozen mini pretzels, optional
  • Red and green sprinkles or smashed candy cane pieces, optional
Chocolate Ganache:
  • 2 cups semi-sweet or dark chocolate chips or chopped block chocolate.

Instructions:
  • Preheat the oven to 300 degrees F.
  • In a mixing bowl, combine the butter and sugar and beat together until light and fluffy, about 3 minutes. Scrape down the sides of the bowl periodically. Beat in the eggs 1 at a time. Add the vanilla.
  • Gently mix in the flour, baking powder, salt, and lemon zest. Once the dry ingredients are incorporated, fold in the almonds and dried cherries.
  • Divide the dough in half and roll the dough into 2 logs. If the dough is sticky, dust with a little flour. Roll the logs to the length of a sheet pan. Beat the egg white with a splash of water.
  • Brush the logs with the egg white and sprinkle with the turbinado sugar. Transfer to a sheet pan and place at least 3 inches apart. Bake in the oven for 30 minutes.
  • Remove from the oven let cool for 10 minutes.
  • Remove logs to a cutting board and slice on the bias about 3/4 inch thick. Lay the biscotti back on the sheet pan and return to the oven for another 10 minutes. This will harden the biscotti. Cool completely on a rack.


Chocolate Ganache:
  • Bring a saucepan with 1-inch of water in it to a boil. Put the chocolate in a large metal or heatproof glass mixing bowl and place on top of the saucepan with boiling water. Pay careful attention that the mixing bowl does not touch the surface of the boiling water. Stir the chocolate until it is almost completely melted. 
  • Remove it from the saucepan and continue stir until the chocolate is completely melted. This entire process should take no more than 5 to 10 minutes.
  • Line a cookie sheet with parchment or wax paper. Dip each biscotti or pretzel in the chocolate to cover half of each and then dip in the sprinkles or candy cane pieces. Set each piece on the lined cookie sheet to allow the chocolate to harden. Store in a cool place in air-tight containers. 

Notes:

  • Store in an airtight container for up to 5 days. If you live in a humid place, airtight is an absolute must! Feel free to try other dried fruits like craisins or blueberries!
  • Try not to eat them all at the same time. :-)
  • Note: Try these dipped in white chocolate for the holidays.


Source: FoodNetwork, Anne Burrell


Friday, December 9, 2016

Lavender Rose Bath Soak

Here’s a sweet little recipe to add some pretty into your day!
We all know the feeling of tired, aching muscles. After a long day, sometimes you come home feeling like you can barely crawl into your bed!
Bath soaks are wonderful for relieving tension and loosening up tight muscles- perfect after a long day at the office or a challenging workout. Add in a few drops of lavender essential oil to calm and relax your mood and mind and you’ll be ready for one fantastic night of sleep!

You’ll need:
  • 1 1/2 cups Epsom Salt (or blend of Epsom and Dead Sea Salt)
  • 1/4 cup Rose Buds & Petals
  • 5-10 Drops Lavender Essential Oil
  • Lidded Jar
Start by mixing the essential oil into the salt. Make sure that you thoroughly blend the oil throughout, breaking up clumps as you go.
Next, add in the rose petals. I used 1/4 cup of petals and buds, but feel free to increase or decrease this amount based on your preferences.
Stir the petals into the salt mixture. For me, I wanted to see the rose petals speckled throughout the salt (not too heavy, but not too light either) so 1/4 cup was just the right amount.
Transfer the mixture into a lidded jar for packaging and storage.
To use:
Add the desired amount of the soak mixture to warm bath water. Soak for at least 20 minutes to relieve muscle tension and relax your body.
ENJOY!
PS- This recipe would make a wonderful gift!

Cinnamon Vanilla Roasted Walnut Butter

This Healthy Pumpkin Walnut Butter has HALF the calories and fat of regular nut butter but TWICE the flavor! [sugar free, low carb, gluten free, vegan]:
Serves: 2 cups

Ingredients

  • 16 ounces walnuts
  • 1 teaspoon vanilla extract
  • ½ teaspoon cinnamon
  • 2 tablespoons honey (optional)

Instructions

Preheat oven to 350 degrees F.

Spread nuts in a single layer on a baking sheet. Bake for 3-5 minutes, remove from oven and stir. Repeat until toasted and dark brown be careful not to overbake and burn; approximately 8-12 minutes. Remove from oven and cool completely.

Place cooled nuts, vanilla, and cinnamon into food processor. Process until nearly smooth or desired consistency. Stop every 30 seconds or so to scrape down sides.


Homemade Cinnamon Vanilla Walnut Butter - wow, this sounds fantastic! Omit the roasting step and use raw walnuts for Phase 3.:
Store in covered container in refrigerator for up to a few months.

Notes
TIPS: Be patient while the nuts are in the food processor. It can take awhile for it to get to the right consistency. You can also add salt or a sweetener (sugar, honey, maple syrup, etc.) to the nut butter recipe. You can add a little oil or water to thin the consistency if you'd like.

SUBSTITUTIONS: You can substitute any kind of nut for the walnuts.

Source:  Lisa Huff - Snappy Gourmet

Wednesday, December 7, 2016

Cranberry Orange Chocolate Scones (GF)*


Serves 4

Ingredients
  • 2 cups blanched almond flour
  • 1/4 cup + 2 tbsp arrowroot
  • 1/2 tsp salt
  • 2 tbsp baking powder
  • 2 tbsp maple syrup
  • 1/4 cup melted coconut oil
  • 1/2 cup dried cranberries
  • 1 1/2 tbsp cacao nibs
  • 1/4 cup mini chocolate chips
  • 1 tsp vanilla
  • 1/4 cup chopped pecans
  •  zest from 1 orange
GLAZE (optional):
1/2 cup confectioners' sugar
1 tablespoon orange juice

ORANGE BUTTER:
1/2 cup butter, softened
2 to 3 tablespoons orange marmalade

Instructions

Combine flour, arrowroot, salt, and baking powder, and set aside. In a small bowl, combine syrup, vanilla, coconut oil, and egg. Whisk until blended. 

Add wet to dry ingredients and mix until combined. Fold in cranberries, chips, zest and nibs. Form dough into a ball and place on a piece of parchment paper. Slightly flatten and place on baking sheet. 

Cut into 8 wedges. Bake at 350 F for 20 minutes.

Let cool and drizzle with the glaze or serve with orange butter (or both!)

Source:  Mazopiya Organic Store


Tuesday, November 22, 2016


Finally a fool proof way to cook an unbelievably moist, no fuss, turkey.  The key is cooking it upside down first, all of the drippings cook into the breast.  I haven't had to baste the turkey every 30 minutes like I have in the past, but it definitely won't hurt if you want to.  The lemon adds just enough freshness to it. The seasoned salt replaces any need to brine a turkey.  Make sure the turkey is taken out enough time prior to roasting and let it rest for 1 hour.  I promise it will stay hot for serving but is critical for a moist turkey. 

You will never cook a turkey any other way.

Yield:10 to 12 servings

Ingredients:

Turkey:

  • One 12- to 14-pound fresh turkey
  • Kosher salt* and freshly ground black pepper
  • 2 tablespoons finely minced fresh oregano
  • 2 tablespoons finely minced fresh parsley
  • 2 tablespoons finely minced fresh tarragon
  • 1 tablespoon ground sumac (optional)
  • 1 tablespoon finely minced fresh thyme
  • 1 teaspoon finely minced shallots
  • Grated zest of 3 lemons (save lemons for next day roasting)
  • 1/2 cup extra-virgin olive oil

Roasting:

  • Kosher salt and freshly ground black pepper
  • 10 sprigs fresh parsley
  • 10 sprigs fresh thyme
  • 5 sprigs fresh sage
  • 3 lemons, halved or cut into thick slices
  • 1 shallot, halved
  • 1 garlic bulb
  • 3 carrots, roughly chopped
  • 3 stalks celery, roughly chopped
  • 1 onion, roughly chopped
  • Water or stock, for the roasting pan
  • 4 tablespoons (1/2 stick) unsalted butter or olive oil
* You can use sea salt too, but it's a bit more expensive so using kosher salt is a less expensive.

Instructions:

For the turkey: 24 hours before 

Take out the gravy bag, giblets and neck from both sides of the turkey. If you want to simmer the giblets in a bit of water and cut them up for your stuffing or feed them to your cat/dog, go for it.  I don't use the gravy packet but you certainly can add the drippings from the turkey to the grave packet and follow the instructions on the packet to make it. My first turkey, I didn't know they were in there and cooked it - it was fine, but I am telling you, they are in there - so don't forget  (-:  

Rinse the turkey in the sink inside and out and make sure that there aren't any missed feathers.  Dry the turkey with paper towels well to ensure that the rub stick to it.

Twenty-four hours before cooking your turkey, liberally season the inside and outside of the turkey with salt and pepper. Using a mini chopper or mortar and pestle, grind the oregano, parsley, tarragon, sumac, thyme, shallots and lemon zest together with some salt and pepper; the salt will help draw the moisture and flavor from the mixture. Add the olive oil to form a paste. 

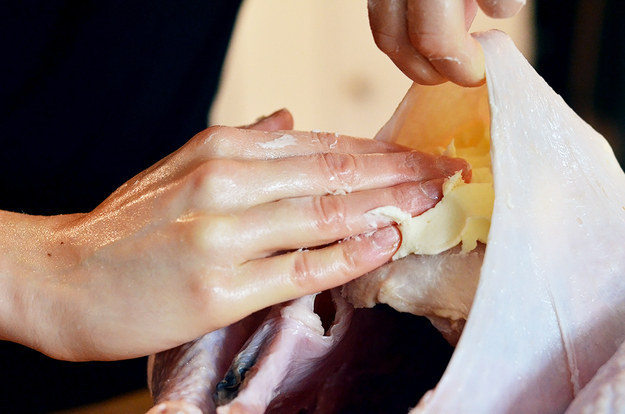
Spread the herb mixture all around the inside and outside of the turkey. (If you want to also rub in between the skin and the turkey for extra flavor, go ahead! Place 2 fingers just under the skin of the turkey and the breast and loosen up the skin without tearing it.  Rub more butter/olive oil in between the layer of skin and the turkey.)


Image result for 2 fingers under the turkey skin

Place fresh sage leaves between the layers.

Refrigerate the turkey, uncovered to dry the skin, for 24 hours.

For the roasting: Remove the turkey from the fridge 90 minutes before roasting and allow it to come to room temperature. (IMPORTANT! this ensures even cooking)

Preheat the oven to 450 degrees F.

Cut the garlic bulb in half and place half of it in the cavity of the turkey and the other half on the wire rack. Put the parsley and thyme sprigs in the cavity with the 2 lemons and shallot halves.

Put the remaining 1 lemon slices under the turkey along with the carrots, celery and onions in the bottom of a roasting pan fitted with a roasting rack. Add a cup of water or stock to the bottom of the pan. 

Add the turkey (UPSIDE DOWN, BREAST SIDE DOWN) to the rack and roast, adding a little more water or stock to the pan if necessary to prevent the drippings from burning, for 30 minutes. 

Take turkey out of the oven, turn down the temperature to 350 degrees.  Flip the turkey breast side up and drizzle with a little more olive oil.  

Note:  Flipping the turkey might be a bit tricky since the turkey is heavy, maybe ask for some help.  You can use a couple of tongs to help, I just kind of roll it over but be careful!!

Put turkey back into oven and continue to roast.  (You can bast the turkey with the pan drippings every 30 minutes but I haven't had to do this and it's incredibly moist.)  

Cook until the thickest part of the leg registers an internal temperature of 155 degrees F, another 2 1/2 to 3 hours. 

Allow the bird to rest, tented with foil, for at least 1 hour before carving. The temperature will rise to about 165 degrees F during resting.

Pour the pan drippings into a saucepan, set the pan over medium-high heat and cook until reduced by one-half, about 10 minutes. Stir in the butter until melted. Pour the reduced turkey drippings over the carved turkey just before serving.

Recipe adapted from FoodNetwork, TheKitchen:  Geoffrey Zakarian (I have altered this recipe to use tips from Martha Stewart's upside down turkey recipe and of course my own changes.)

Easy Cloud Bread (GF)


"Cloud bread is soft and fluffy - like a cloud! It's a great substitute for 'regular' bread and is low in carbs. Although it's not firm enough to replace bread in a regular sandwich, I like to top one 'slice' with peanut butter and bananas, toast it with jam or with my favorite lunch meat and fillings!" - Yummly


5 servings

Ingredients:

  • 3 large eggs, separated
  • 1/4 teaspoon cream of tartar 2 ounces cream cheese, very soft
  • Optional:  1 tablespoon white sugar, honey or sugar substitute like Truvia

* Try other add-ins like garlic powder, onion powder, sea salt and herbs and eliminate the sugar for a savory "bread".
**  Best to keep in the refrigerator or freeze them, they will mold after a couple of days if left out. Make sure to put pieces of parchment paper on the bottoms to prevent stickage (yes, that's a word).

Instructions:

Preheat oven to 350 degrees F (175 degrees C). Line a baking sheet with parchment paper.

Beat egg whites and cream of tartar together in a bowl until stiff peaks form.

Mix egg yolks, cream cheese, and sugar together in a separate bowl using a wooden spoon and then mixing with a hand-held egg beater until mixture is very smooth and has no visible cream cheese. Gently fold egg whites into cream cheese mixture, taking care not to deflate the egg whites.

Carefully scoop mixture onto the prepared baking sheet, forming 5 to 6 "buns".

Bake in the preheated oven until cloud bread is lightly browned, about 20-30 minutes. (check after 15 minutes for doneness)

Source:  allrecipes.com

Monday, November 21, 2016

Pumpkin Bread (GF)


Share this post and let’s spread the joy of authentic home cooking! 

~ * ~ * ~ * ~
Let's Get Cooking!
~ * ~ * ~ * ~

Serves 8 to 10 (1 loaf)

Ingredients :

  • 2 cups Bob's Red Mill Gluten Free All Purpose Baking Flour
  • 2 teaspoon baking powder
  • ½ teaspoon baking soda
  • 1 teaspoon salt
  • 2 teaspoon cinnamon
  • ¼ teaspoon nutmeg
  • ¼ teaspoon ginger
  • 1 ½ cup canned pumpkin
  • ½ cup sugar
  • ½ cup milk
  • 2 eggs
  • ¼ cup soft butter

Instructions:


  • Preheat oven to 350 degrees.
  • Mix together flour, baking powder, baking soda, salt, and spices. 
  • Combine pumpkin, sugar, milk, and eggs in separate mixing bowl. 
  • Add dry ingredients and butter, mix till well blended.
  • Spread into greased 9x5x3 loaf pan. Bake at 350 degrees for 55 minutes or until inserted toothpick comes out clean. 

Source:  theglutenexchange.com

Pumpkin Bread (GF) Fresh Pumpkin


Yield: 1 loaf

The gluten free pumpkin bread is so moist and full of flavor! This recipe kicks off fall in our home!

Ingredients:

  • 2 cups Bob's Red Mill 1:1 Gluten Free Flour Blend
  • 2 teaspoons pumpkin pie spice
  • 1 teaspoon baking soda
  • 1/4 teaspoon baking powder
  • 1/2 teaspoon sea salt
  • 1 1/2 cups sugar
  • 3/4 cup coconut oil
  • 3 large eggs
  • 1 Tablespoon vanilla extract
  • 3 cups shredded fresh pumpkin or canned pumpkin,a 15 oz can of pumpkin is just shy of 2 cups.  16 oz = 2 cups. (see note below)

Instructions:

Preheat the oven to 325°F.

Combine dry ingredients:  the flour, cinnamon, baking soda, baking powder, and salt together in a bowl and set aside. 

In the bowl of mixer with whip attachment, mix the sugar and eggs until doubled in volume.  Add in the melted coconut oil and vanilla extract.

Add the dry ingredients and mix well on slow speed.
  
Fold in the shredded pumpkin or 3 cups of canned pumpkin.

Once the ingredients are all incorporated pour into a greased 9 by 5 by 3-inch loaf pan.

For Bread:  Bake for 1 hour and 15 minutes. At this point a knife inserted into the middle of the loaf should come out clean. Cool for 15 minutes and turn out onto a cooling rack. Cool completely. 

For Muffins: temperature should also be 325 degrees F, but bake for 30 minutes.

Pumpkin Canned vs Fresh:
You can substitute canned pumpkin in almost any dish in which you’d use fresh. When you substitute canned pumpkin for fresh, use the same amount, so for example, use 1 cup of canned in place of 1 cup of fresh pumpkin. Spoon the pumpkin from the can, and place it into a measuring cup, gently packing and pressing it into the measuring cup with the spoon. Carefully fill the measuring cup, and level off the top of the cup with a knife to assure the amount is accurate.

Canned Pumpkin Ingredients:
Buy canned pumpkin that does not contain any salt, spices or ingredients other than pumpkin. Read the can’s ingredients section on the label to assure that the can contains only pumpkin. When you buy plain canned pumpkin without spices or other ingredients, you can add these components to your recipes yourself, in the amounts that your recipes specify.

Source:  In the Kitchen with Stacey

Sunday, November 20, 2016

French Duchess Potatoes


This is a perfect way to use left over mashed potatoes if you have them!  The cheese really adds another layer of flavor.  If you are not a nutmeg fan, simply leave it off.  This is a classic french side dish that is served in one of the most expensive french restaurants in New York.  Very classic, elegant and delicious!

Perfect for Christmas or Easter dinner.


Duchess Potatoes Recipe
Yield:8 servings

Ingredients
  • 2 pounds (about 4 medium) russet potatoes, peeled and cut into 1-inch pieces
  • Kosher salt and freshly ground black pepper
  • 1/4 cup heavy cream
  • 1 stick (8 tablespoons) unsalted butter, plus more for greasing the baking dish
  • 2 egg yolks
  • 1/2 cup grated Gruyere cheese, optional
  • Freshly grated nutmeg, optional

Instructions

In a large pot, combine the potatoes, 1 teaspoon salt and enough cold water to cover. Bring to a boil over high heat. Lower the heat and simmer until fork tender, 10 to 12 minutes. Drain the potatoes and then press through a ricer or food mill back into the pot they were cooked in.* Place over low heat for a few minutes to dry the potatoes.

Heat the cream and 1/2 stick of the butter in a saucepan over medium-low heat until the butter melts and the cream is warm but not hot. Stir the mixture into the potatoes. Mix in the egg yolks and season with salt and pepper. Add cheese and nutmeg if desired.

Preheat the oven to 400 degrees F. Grease a medium baking dish with butter.

Melt the remaining 1/2 stick butter in a small pot over low heat.

Fill a piping bag fitted with a star tip with the mashed potatoes. Into the prepared baking dish, pipe the potatoes in a circular motion, about 3 inches in diameter, starting from the outside and filling in a circle. Finish by piping upwards for a nice swirl on top. Repeat to fill the entire baking dish. Brush each circle with the melted butter. Bake in the oven until golden brown, 30 to 40 minutes.

Note:  These will "puff" up a bit with the egg yolks so when you are piping them into the dish, leave a little room between each one and they will puff up and end up touching one another.  


Special equipment: a piping bag fitted with a star tip

* If you don't have a ricer or food mill, use a potato masher and mash them really well to mostly eliminate all chunks or a beater.  Be careful not to over mix them so they turn out "gummy". 

Source:  FoodNetwork:  Geoffrey Zakarian